Frequently Asked Question
Processing timesheets
Last Updated 8 years ago
To create and process a timesheet, you must first create a booking in the system. Even if the booking is a historical shift, it still needs to be added into the system. There is a separate article detailing how to create a new booking.
You also need to ensure that you have pay and charge rates set up for each Client. There is a separate help article for this.
It is also possible to add a timesheet direct into the timesheet menu when you find additional shifts have been added to a timesheet you are processing. There is also a separate help article for this.
Invoice/Wages Menu - Timesheets
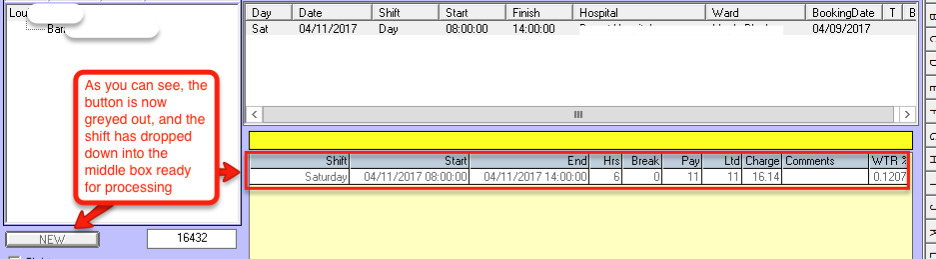
Timesheets are organised by week. The screen will always default to the current week. The current year and week number are shown at the top left hand side of the screen.
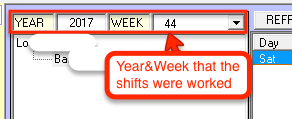
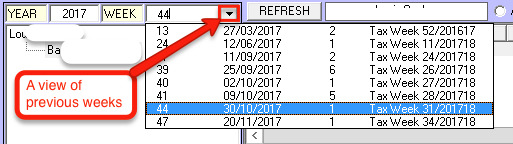
To process timesheets from previous weeks select the correct week number from the drop down box. The start date is of that particular week is also displayed, it's the Monday starting that week.
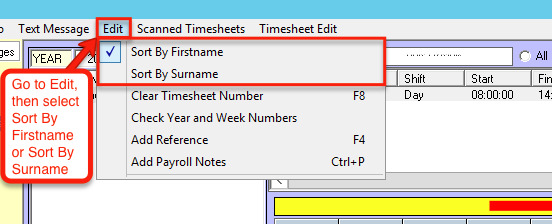
Staff are listed alphabetically in first name order directly below the week number. If you prefer the sort to be in Surname order this can be changed by selecting Edit on the grey menu bar at the top of the screen, and ticking Sort by Surname.
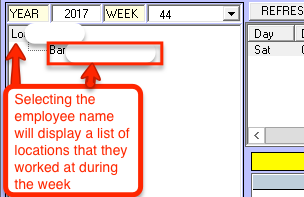
When you select an employee all the locations they have outstanding time sheets for the week selected above are listed.
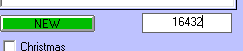
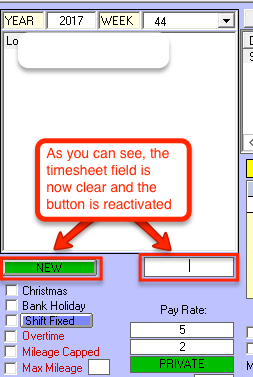
Before you can process the timesheet you will need to enter the timesheet number. (Note, you can also allow the system to automatically generate a timesheet number for you by clicking the green New button without entering a number).
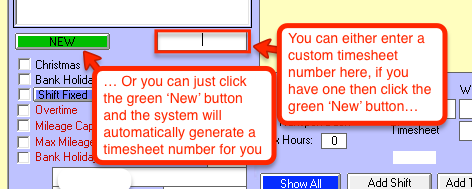
If your timesheets are pre printed with a number you will need to use the first method of entering in the timesheet number before clicking the green 'New' button.
If you put in the Wrong Timesheet Number
On the grey menu bar at the top of the screen select Edit and then select Clear timesheet Number. You can then enter the correct timesheet number.
Alternatively you can press the F8 key on your keyboard.

Processing the Timesheet
The shifts expected on the timesheet will be listed.
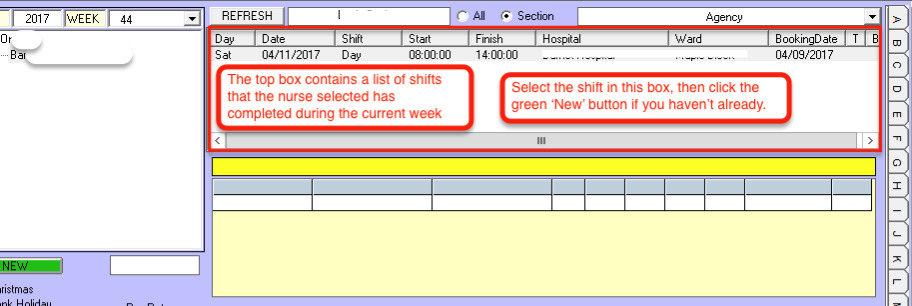
Highlight the first shift on the timesheet so that it is grey. Check the shift details are correct.

Editing or Correcting the Shift Details
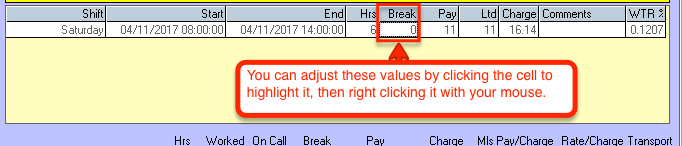
If any of these details are incorrect or need to be changed, the nurse grade, nurse rate, shift type, shift start and finish times and dates, and shift location can be amended by clicking Edit at the bottom left of the screen, followed by clicking Save after the corrections have been entered.
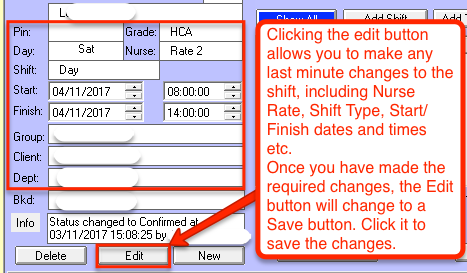
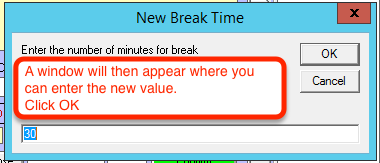
To correct any of the first six fields as above, Click Edit at the bottom left of the screen. Click on the field to be changed and an arrow will appear in the box to give you a drop down menu of allowed changes. If a shift starts during the evening and finishes the following morning ensure that the dates entered are correct for the start and finish. ie if it starts on the evening of the 14th it will finish on the following day 15th if it finishes after midnight. When you have corrected the shift click on Save to update the main screen shift details.
You can also set the shift to 'Shift Fixed' if the shift in question runs over two dates. For example, if a nurse started on a Friday night at 21:00 and finished at 9:00 on the Saturday morning, the system will recognise this and pay the Friday Night rate until 6:00am on Saturday, then pay the Saturday rate from 6:00 until 9:00. If this is what you want, you can leave it, but if you want the shift to only be paid at the Friday Night rate, you must click the Shift Fixed button.
You can also set up the rate to automatically fix the shift under the Pay Scales set up page, this is explained in detail in a separate help file, found here. (Insert Link).
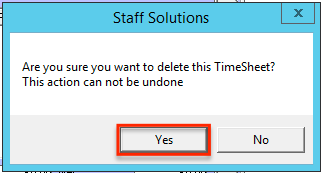
Deleting an Unworked Shift
Select the shift so that it is highlighted. At the bottom left of the screen click on the Delete Button. This will remove the shift.

A confirmation box will then appear asking if you want to continue with the deletion. Click Yes if you want to delete the shift.
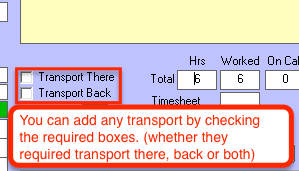
Other Permitted Changes
The transport can be changed in the main body of the screen by ticking/unticking the boxes 'Transport There' and 'Transport Back'.
Mileage can be added providing that the client pay level has been set up to allow mileage to be processed. Please click here to view our help file on adding mileage for more information.
There is also a tick box for 'Do Not Pay' which will make sure that no pay is calculated for the member of staff for this shift. (eg: for Office Staff covering a shift, where they receive a salary).
There is also a ticik box for ' Do Not Charge' this will ensure that this shift is not passed through for an invoice to be raised. (eg: A Set weekly amount is invoiced to the client, but staff are paid individually for the shifts)
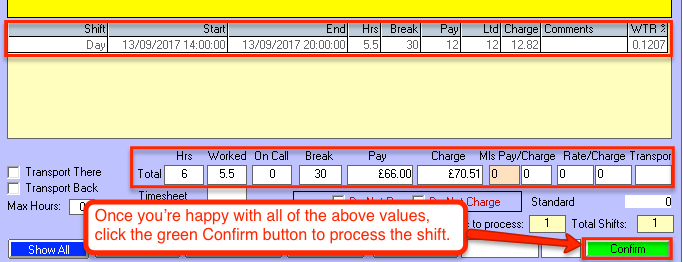
Confirming the Shift
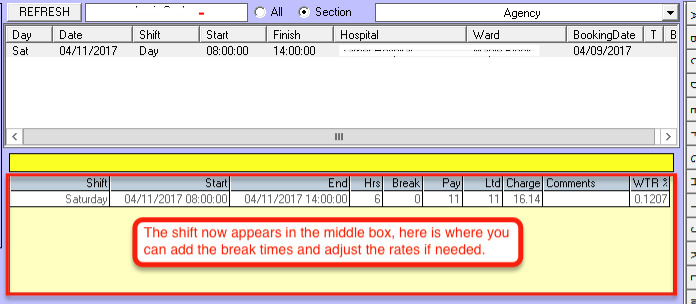
Under the yellow box a summary of the shift is shown giving the total hours worked and the break the total pay for the member of staff, and the charge to the client. When you are happy that the information is correct click on the Confirm Button.
The shift information drops to the bottom of the screen.
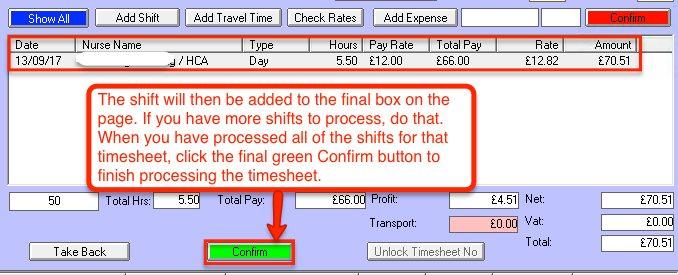
Continue processing the shifts on this time sheet until you have processed all the shifts.
When you have confirmed all of the shifts for that particular person, you must click the final confirm button to finish the process. The final confirm button will turn green, and a prompt will appear telling you to click it.
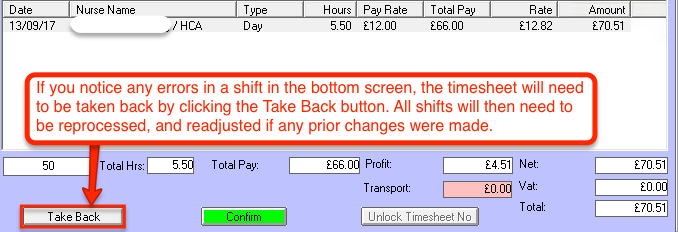
Correcting a Mistake on a Timesheet that is at the bottom of the screen.
Select the shift in the bottom of the screen and click on the Take Back button to send the shift back to the top of the screen. Any changes that were made when processing this shift previously will have been reversed back to the original information.
Splitting the Timesheet
A time sheet can be split if you find that a shift that is showing is not on the physical paper timesheet you are processing. When the shifts that are on the paper timesheet have all been processed and are showing in the bottom box of the screen. Click on the Grey Confirm button.
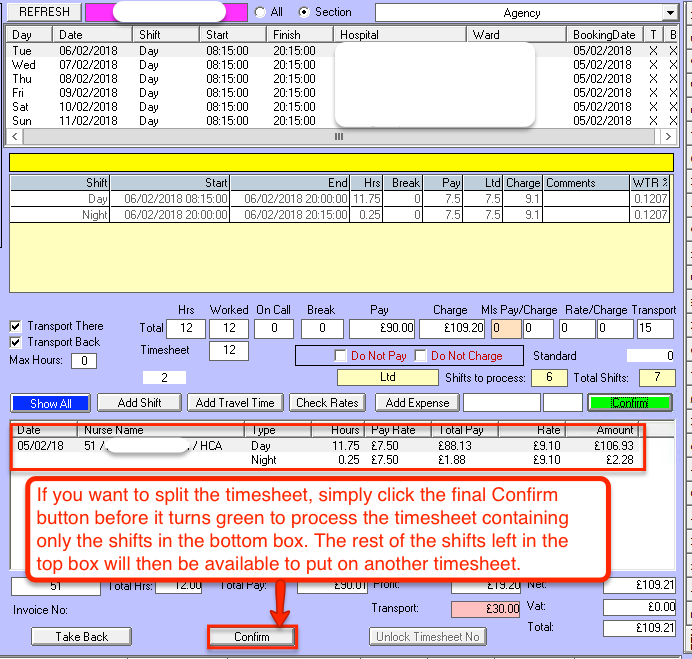
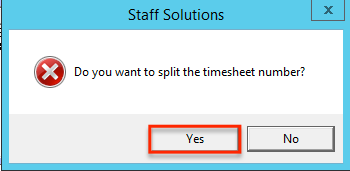
You will be asked if you want to split the timesheet. Answer Yes to split the timesheet. Answer No to continue processing.
Confirming you have finished with the Timesheet
When all shifts have been processed for a timesheet click on the Confirm button at tthe bottom of the screen.

You also need to ensure that you have pay and charge rates set up for each Client. There is a separate help article for this.
It is also possible to add a timesheet direct into the timesheet menu when you find additional shifts have been added to a timesheet you are processing. There is also a separate help article for this.
Invoice/Wages Menu - Timesheets
Timesheets are organised by week. The screen will always default to the current week. The current year and week number are shown at the top left hand side of the screen.
To process timesheets from previous weeks select the correct week number from the drop down box. The start date is of that particular week is also displayed, it's the Monday starting that week.
Staff are listed alphabetically in first name order directly below the week number. If you prefer the sort to be in Surname order this can be changed by selecting Edit on the grey menu bar at the top of the screen, and ticking Sort by Surname.
When you select an employee all the locations they have outstanding time sheets for the week selected above are listed.
Before you can process the timesheet you will need to enter the timesheet number. (Note, you can also allow the system to automatically generate a timesheet number for you by clicking the green New button without entering a number).
If your timesheets are pre printed with a number you will need to use the first method of entering in the timesheet number before clicking the green 'New' button.
If you put in the Wrong Timesheet Number
On the grey menu bar at the top of the screen select Edit and then select Clear timesheet Number. You can then enter the correct timesheet number.
Alternatively you can press the F8 key on your keyboard.
Processing the Timesheet
The shifts expected on the timesheet will be listed.
Highlight the first shift on the timesheet so that it is grey. Check the shift details are correct.
- Date
- Day of Week
- Shift
- Start & Finish
- Client/Hospital
- Location/Ward
- xx indicates Transport will be charged to employee for T(there) and B(back)
Editing or Correcting the Shift Details
If any of these details are incorrect or need to be changed, the nurse grade, nurse rate, shift type, shift start and finish times and dates, and shift location can be amended by clicking Edit at the bottom left of the screen, followed by clicking Save after the corrections have been entered.
To correct any of the first six fields as above, Click Edit at the bottom left of the screen. Click on the field to be changed and an arrow will appear in the box to give you a drop down menu of allowed changes. If a shift starts during the evening and finishes the following morning ensure that the dates entered are correct for the start and finish. ie if it starts on the evening of the 14th it will finish on the following day 15th if it finishes after midnight. When you have corrected the shift click on Save to update the main screen shift details.
You can also set the shift to 'Shift Fixed' if the shift in question runs over two dates. For example, if a nurse started on a Friday night at 21:00 and finished at 9:00 on the Saturday morning, the system will recognise this and pay the Friday Night rate until 6:00am on Saturday, then pay the Saturday rate from 6:00 until 9:00. If this is what you want, you can leave it, but if you want the shift to only be paid at the Friday Night rate, you must click the Shift Fixed button.
You can also set up the rate to automatically fix the shift under the Pay Scales set up page, this is explained in detail in a separate help file, found here. (Insert Link).
Deleting an Unworked Shift
Select the shift so that it is highlighted. At the bottom left of the screen click on the Delete Button. This will remove the shift.
A confirmation box will then appear asking if you want to continue with the deletion. Click Yes if you want to delete the shift.
Other Permitted Changes
The transport can be changed in the main body of the screen by ticking/unticking the boxes 'Transport There' and 'Transport Back'.
Mileage can be added providing that the client pay level has been set up to allow mileage to be processed. Please click here to view our help file on adding mileage for more information.
There is also a tick box for 'Do Not Pay' which will make sure that no pay is calculated for the member of staff for this shift. (eg: for Office Staff covering a shift, where they receive a salary).
There is also a ticik box for ' Do Not Charge' this will ensure that this shift is not passed through for an invoice to be raised. (eg: A Set weekly amount is invoiced to the client, but staff are paid individually for the shifts)
Confirming the Shift
Under the yellow box a summary of the shift is shown giving the total hours worked and the break the total pay for the member of staff, and the charge to the client. When you are happy that the information is correct click on the Confirm Button.
The shift information drops to the bottom of the screen.
Continue processing the shifts on this time sheet until you have processed all the shifts.
When you have confirmed all of the shifts for that particular person, you must click the final confirm button to finish the process. The final confirm button will turn green, and a prompt will appear telling you to click it.
Correcting a Mistake on a Timesheet that is at the bottom of the screen.
Select the shift in the bottom of the screen and click on the Take Back button to send the shift back to the top of the screen. Any changes that were made when processing this shift previously will have been reversed back to the original information.
Splitting the Timesheet
A time sheet can be split if you find that a shift that is showing is not on the physical paper timesheet you are processing. When the shifts that are on the paper timesheet have all been processed and are showing in the bottom box of the screen. Click on the Grey Confirm button.
You will be asked if you want to split the timesheet. Answer Yes to split the timesheet. Answer No to continue processing.
Confirming you have finished with the Timesheet
When all shifts have been processed for a timesheet click on the Confirm button at tthe bottom of the screen.