Frequently Asked Question
How can I start an employee's sick pay?
Last Updated 9 years ago
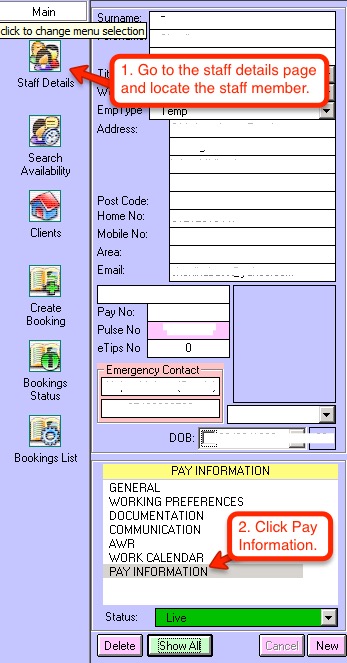
To start a new sick note for an employee you must first navigate to their Staff Details page. From here you must bring up their Pay Information by clicking “Pay Information”
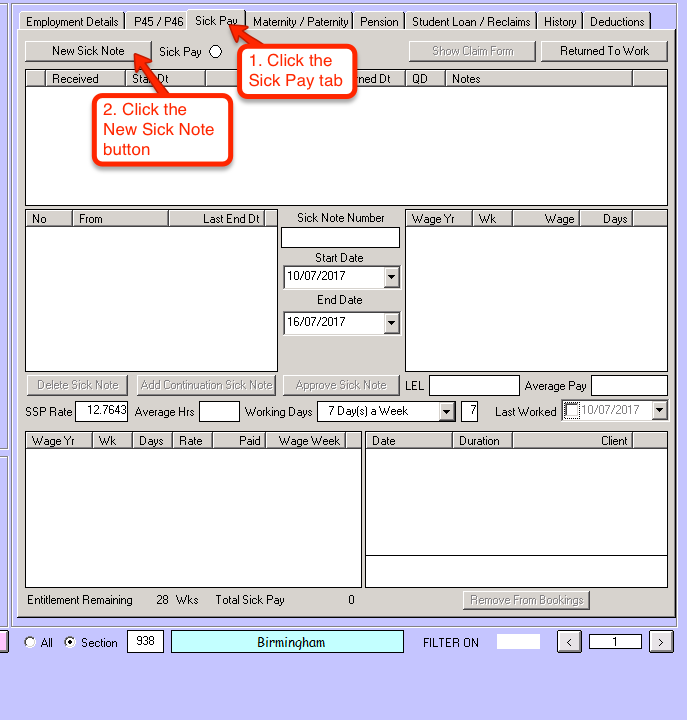
Once you have brought up the employees pay information, you will need to click the “Sick Pay” tab near the top of the grey window (it’s the third one across). You should now be in the Sick Pay section for that specific staff member. To start the sick pay process, click the “New Sick Note” button in the top left of that grey window. The tab for Sick Pay will not show for staff that are self employed or have their own limited company as they are not entitled to sick pay.
A new window will appear. This is where you enter all the details for the employee's first sickness period.
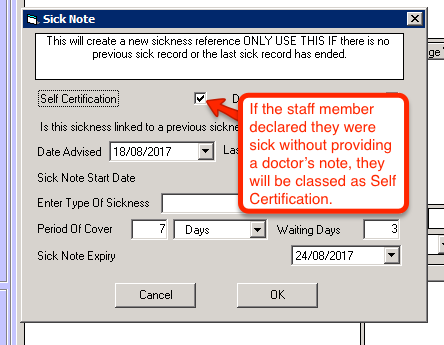
If the employee needs 7 or more days off for sick leave, you should ask them for a doctor’s note (fit note). Check the Doctors Note field if this is true. Tick the 'Self Certification' box if the employee has not provided a Sick Note from their doctor
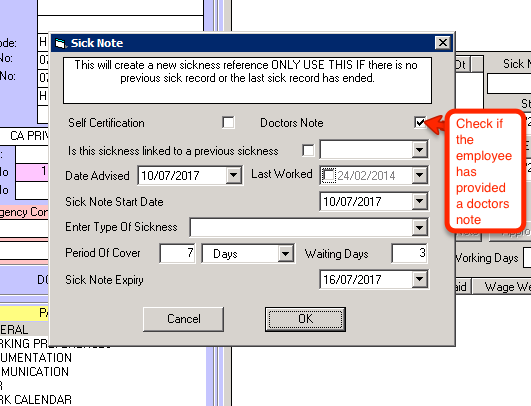
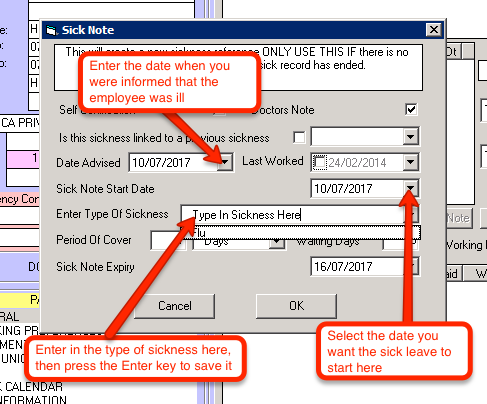
There are four date fields:
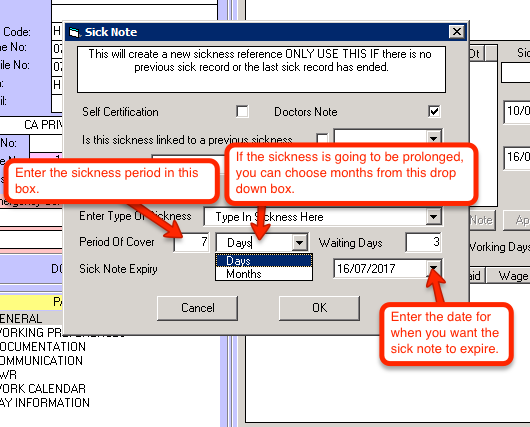
Period of cover can be entered as days or months. Enter the number then use the drop down box to determine whether this is e.g.: 6 days or 6 months. If the time period is weeks then you will need to multiply by 7 and add as days.
You can also enter the type of sickness. If the drop down box is empty because you haven’t provided a sick note desription before, or you need to enter a different sick type, you will need to type the sickness type into the “Enter Type of Sickness” box and then press the Enter key. To check if this has saved, you can click the drop down arrow in that box and the newly entered sickness type should appear in the list below and can now be selected from the list.
The Sick Note Expiry field contains the date when the sick note will expire, meaning the sick pay will stop after that date. The date should be automatically filled in, but if it’s not you can select the correct date by clicking the drop down menu and choosing the date from the calendar that appears.
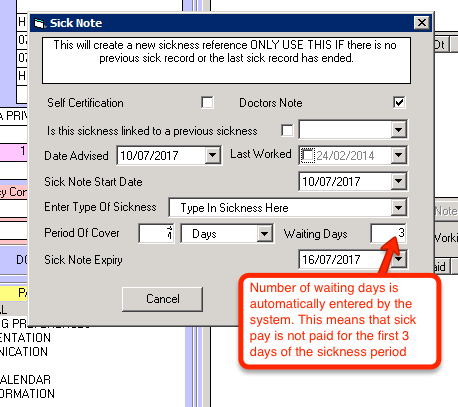
The waiting days field should be automatically filled in with the value of 3, and it doesn’t need to change. This is the standard period where sick pay isn’t paid. For example, if the employee takes off a full work week (Mon - Fri), Monday, Tuesday, and Wednesday are counted as waiting days and are not paid sick pay. Thursday and Friday are normal qualifying days, so the SSP daily rate is paid for those two days.
If the employee normally works 6 days a week, then the SSP daily rate would be paid for the three days after the 3 waiting days.
Press the OK button at the bottom of the window to continue.
The new sick note should now be loaded into the list at the top of the window. Check the box indicated below and if you see the message 'Bookings after the start of sickness please replace member of staff'
You will need to remove the staff from the bookings (at the very least during the sick note period but maybe all future bookings) until you know that the member of staff is available to work again.
Highlight the bookings one by one and click on remove from booking. This will remove the staff member from the bookings and set the bookings back to available.

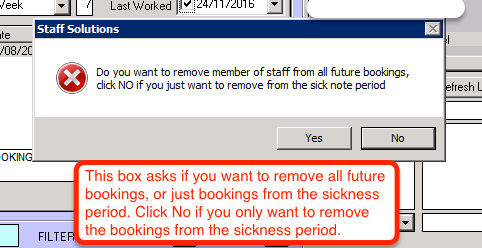
You will not be able to approve the sick note until at the very least bookings for this member of staff within the sick note period have been cleared.
Before approving the sick note you will also need to set the number of days a week the member of staff normally works, and if there is a pattern which days of the week the member of staff normally works. This is used to calculate the correct daily rate for the first part week of sick pay. Following full weeks of sickness will automatically qualify for the full SSP payment. The system will calculate an average number of days a week, but due to the nature of agency working, this may not always be correct so an override is allowed where you can set the the number of days and which days of the week the member of staff normally works.
If you want to change the working days to reflect the average, you can do so by changing the value in the drop down box.

As previously mentioned, this doesn't have to be done and can be changed to whatever value you see fit.
Once you are happy the information has all been entered correctly to continue, select the sick note from the left box in the grey window, then click the “Approve Sick Note” button in the middle of the page.
When this message box pops up confirming that it’s OK to approve the sick note, press yes.
The approved sick note should now load into the bottom left box, with the pay and remaining entitlement being worked out automatically.
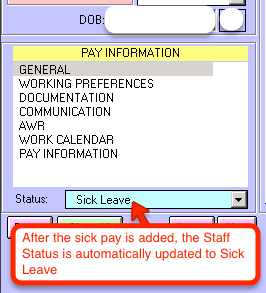
The staff member is also automatically set to the “Sick Leave” status.
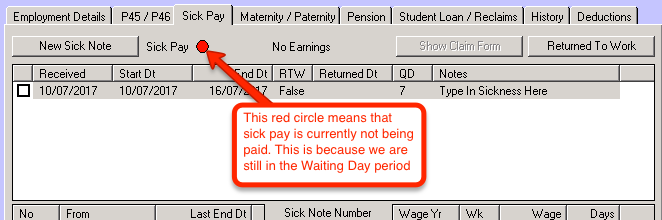
The sick pay indicator (the circle) will be red when sick pay isn't being paid, for example if the current day is a waiting day, or if the employee is not entitled to sick pay.
Once you have brought up the employees pay information, you will need to click the “Sick Pay” tab near the top of the grey window (it’s the third one across). You should now be in the Sick Pay section for that specific staff member. To start the sick pay process, click the “New Sick Note” button in the top left of that grey window. The tab for Sick Pay will not show for staff that are self employed or have their own limited company as they are not entitled to sick pay.
A new window will appear. This is where you enter all the details for the employee's first sickness period.
If the employee needs 7 or more days off for sick leave, you should ask them for a doctor’s note (fit note). Check the Doctors Note field if this is true. Tick the 'Self Certification' box if the employee has not provided a Sick Note from their doctor
There are four date fields:
- Date Advised - This is the date the employee advised you they were sick
- Last Worked - Pulse fills this automatically from the bookings raised
- Sick Note Date - This is the start date from the doctors sick note, otherwise use the Date Advised
- Sick Note Expiry - This is calculated by Pulse using the sick note start date plus the time period in days or weeks from the sick note
Period of cover can be entered as days or months. Enter the number then use the drop down box to determine whether this is e.g.: 6 days or 6 months. If the time period is weeks then you will need to multiply by 7 and add as days.
You can also enter the type of sickness. If the drop down box is empty because you haven’t provided a sick note desription before, or you need to enter a different sick type, you will need to type the sickness type into the “Enter Type of Sickness” box and then press the Enter key. To check if this has saved, you can click the drop down arrow in that box and the newly entered sickness type should appear in the list below and can now be selected from the list.
The Sick Note Expiry field contains the date when the sick note will expire, meaning the sick pay will stop after that date. The date should be automatically filled in, but if it’s not you can select the correct date by clicking the drop down menu and choosing the date from the calendar that appears.
The waiting days field should be automatically filled in with the value of 3, and it doesn’t need to change. This is the standard period where sick pay isn’t paid. For example, if the employee takes off a full work week (Mon - Fri), Monday, Tuesday, and Wednesday are counted as waiting days and are not paid sick pay. Thursday and Friday are normal qualifying days, so the SSP daily rate is paid for those two days.
If the employee normally works 6 days a week, then the SSP daily rate would be paid for the three days after the 3 waiting days.
Press the OK button at the bottom of the window to continue.
The new sick note should now be loaded into the list at the top of the window. Check the box indicated below and if you see the message 'Bookings after the start of sickness please replace member of staff'
You will need to remove the staff from the bookings (at the very least during the sick note period but maybe all future bookings) until you know that the member of staff is available to work again.
Highlight the bookings one by one and click on remove from booking. This will remove the staff member from the bookings and set the bookings back to available.
You will not be able to approve the sick note until at the very least bookings for this member of staff within the sick note period have been cleared.
Before approving the sick note you will also need to set the number of days a week the member of staff normally works, and if there is a pattern which days of the week the member of staff normally works. This is used to calculate the correct daily rate for the first part week of sick pay. Following full weeks of sickness will automatically qualify for the full SSP payment. The system will calculate an average number of days a week, but due to the nature of agency working, this may not always be correct so an override is allowed where you can set the the number of days and which days of the week the member of staff normally works.
If you want to change the working days to reflect the average, you can do so by changing the value in the drop down box.
As previously mentioned, this doesn't have to be done and can be changed to whatever value you see fit.
Once you are happy the information has all been entered correctly to continue, select the sick note from the left box in the grey window, then click the “Approve Sick Note” button in the middle of the page.
When this message box pops up confirming that it’s OK to approve the sick note, press yes.
The approved sick note should now load into the bottom left box, with the pay and remaining entitlement being worked out automatically.
The staff member is also automatically set to the “Sick Leave” status.
The sick pay indicator (the circle) will be red when sick pay isn't being paid, for example if the current day is a waiting day, or if the employee is not entitled to sick pay.