Frequently Asked Question
Expiry Dates: How they Work
Last Updated 9 years ago
Expiry Dates can be set for the following fields:
This screen can also be viewed under the Reports Menu, Expiry Information
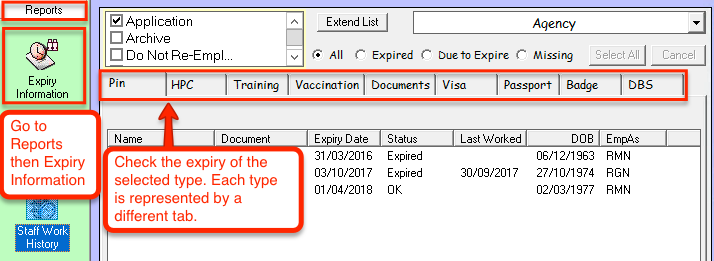
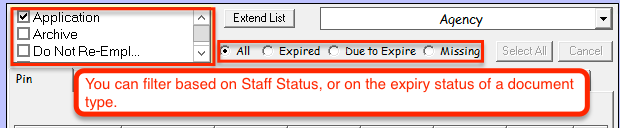
You can then filter the report by the Staff Status (whether the staff is Live, Not Yet, Application, etc.) and by the Expiry Status of the selected document type (whether the document is Expired, Due To Expire, Missing, or All 3 options at once).
You can then send this report to Excel by clicking the 'Print' button. When the excel window opens, you are greeted by the Print Preview screen. From this screen you can print it immediately, or you can close the Print Preview screen and will have access to the report in an Excel sheet where you can format and edit the report to your liking.


Changing the Expiry warning time frame
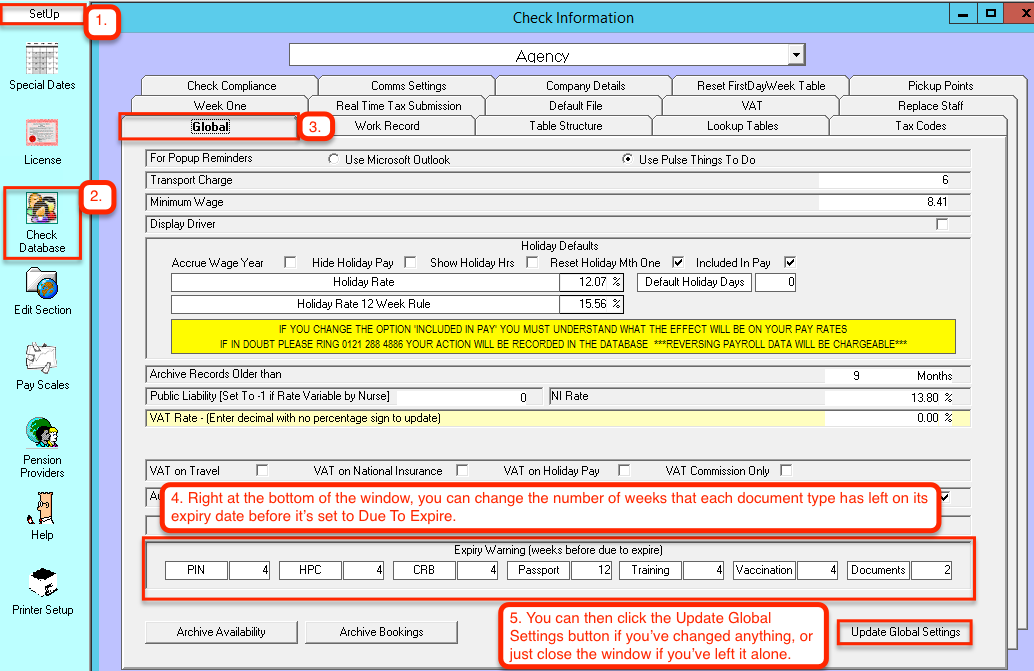
You can edit the amount of time each document type has left on its expiry time before the status is set to 'Due To Expire' as a warning. To do this, go to the SetUp menu -> Check Database -> Global. The final box on this window contains all of the different time frames where each document type is changed to 'Due To Expire'. You can edit these values, then click the Update Global Settings button to save the changes.
DBS
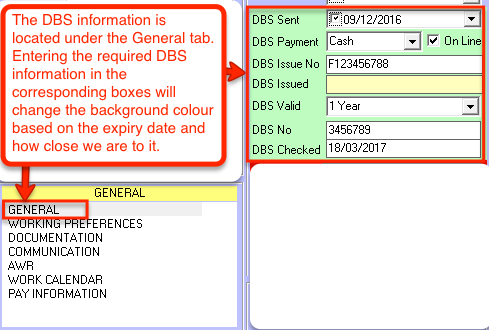
DBS information is filled in on the General Information tab of the Staff Details page. The choices are 'No Expiry', 'Not Required', or any period between 1-5 years (Note: If the Nurse does not require a DBS and therefore does not have any DBS details to be entered in, the choice must be set to 'Not Required' instead of 'No Expiry' as the various DBS checks in the system will not allow for the staff member to be booked on any shifts). Select the required expiry choice and then in the field DBS Issue enter the date the DBS was issued. In the field DBS No enter the DBS number. The software will calculate the expiry date according to the number of years the DBS is valid for, and the date of issue. There is also a 'DBS Checked' field which allows you to enter the date whenever you check the DBS, which will help you when keeping track of the last time you checked the DBS of a staff member.
The DBS section changes colour based on the expiry time. If the section is green, it means that the DBS is valid and not close to expiry. If the section is yellow, it means that the DBS is close to expiry (based on the number of weeks that you have set, as discussed previously). If the section is red, it means the DBS has expired, and therefore the staff member will be unable to work shifts until their DBS has been validated again.
Pin, Passport, Visa
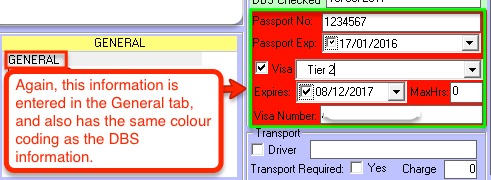
NMC Pin, Passport and Visa are entered on the general information tab, for all of these the expiry date needs to be entered, not the issue date.
The PIN also has a colour coded expiry warning. If the colour is green, the PIN is 1 month or more away from expiry and is still valid. If the colour is yellow, the PIN is less than 1 month away from expiry, but it still valid. If the colour is red, the PIN has passed the expiry date and is no longer valid.
The same colour code formatting applies to the Passport and Visa expiry.
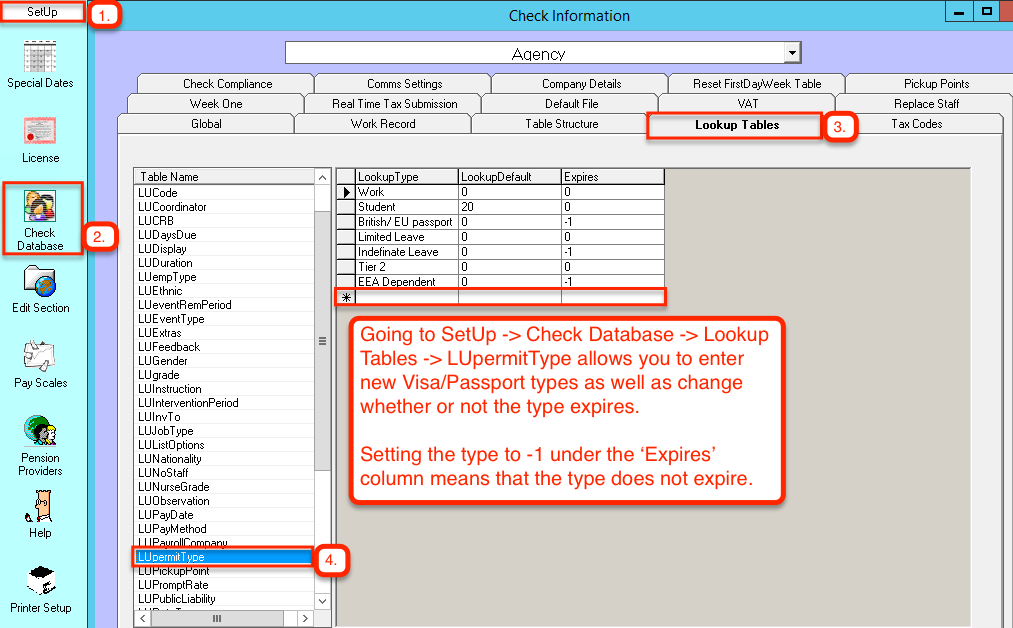
The Visa works slightly differently where if the staff member has a British/EU Passport, is EEA Dependent or Indefinite Leave, then the visa doesn't expire. You can also add additional Visa types by going to SetUp -> Check Database -> Lookup Tables and looking for 'LUpermitType' in the list. This table contains all the existing Visa types in the system. To add a new one, simply enter the name of the type in the first column (the LookupType column), then enter a number in the second column (the LookupDefault column) and then in the third and final column (the Expires column) enter 0 if you want the Visa type to expire (like a work or student Visa) or a -1 if you want the Visa to never expire (like an EU citizen).
Documents, Training, and Vaccinations
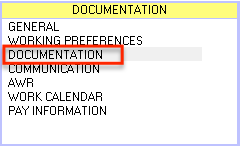
Documents, Training, and Vaccinations are located under the 'Documentation' tab of the Staff Details page.
Document Types, Training Types, and Vaccination Types are custom entered into the software. This allows for maximum flexibility for each company. To enter new Document, Training, or Vaccination types, click on the green header bar 'Documents', 'Training', or 'Vaccinations' (All of them work the same way). A list will be displayed of all the types already set up in the system. Each type entered can have its own expiry time in months. The expiry time is entered or changed by highlighting the type you want to edit, using the drop down box at the bottom right of the box, then selecting the number of months until expiry. New expiry months can be added by simply typing them into the box. You will need to press the Update button before closing the form.

- DBS
- NMC Pin
- Passport
- Visa
- All Custom Entered Training
- All Vaccinations
This screen can also be viewed under the Reports Menu, Expiry Information
You can then filter the report by the Staff Status (whether the staff is Live, Not Yet, Application, etc.) and by the Expiry Status of the selected document type (whether the document is Expired, Due To Expire, Missing, or All 3 options at once).
You can then send this report to Excel by clicking the 'Print' button. When the excel window opens, you are greeted by the Print Preview screen. From this screen you can print it immediately, or you can close the Print Preview screen and will have access to the report in an Excel sheet where you can format and edit the report to your liking.
Changing the Expiry warning time frame
You can edit the amount of time each document type has left on its expiry time before the status is set to 'Due To Expire' as a warning. To do this, go to the SetUp menu -> Check Database -> Global. The final box on this window contains all of the different time frames where each document type is changed to 'Due To Expire'. You can edit these values, then click the Update Global Settings button to save the changes.
DBS
DBS information is filled in on the General Information tab of the Staff Details page. The choices are 'No Expiry', 'Not Required', or any period between 1-5 years (Note: If the Nurse does not require a DBS and therefore does not have any DBS details to be entered in, the choice must be set to 'Not Required' instead of 'No Expiry' as the various DBS checks in the system will not allow for the staff member to be booked on any shifts). Select the required expiry choice and then in the field DBS Issue enter the date the DBS was issued. In the field DBS No enter the DBS number. The software will calculate the expiry date according to the number of years the DBS is valid for, and the date of issue. There is also a 'DBS Checked' field which allows you to enter the date whenever you check the DBS, which will help you when keeping track of the last time you checked the DBS of a staff member.
The DBS section changes colour based on the expiry time. If the section is green, it means that the DBS is valid and not close to expiry. If the section is yellow, it means that the DBS is close to expiry (based on the number of weeks that you have set, as discussed previously). If the section is red, it means the DBS has expired, and therefore the staff member will be unable to work shifts until their DBS has been validated again.
Pin, Passport, Visa
NMC Pin, Passport and Visa are entered on the general information tab, for all of these the expiry date needs to be entered, not the issue date.
The PIN also has a colour coded expiry warning. If the colour is green, the PIN is 1 month or more away from expiry and is still valid. If the colour is yellow, the PIN is less than 1 month away from expiry, but it still valid. If the colour is red, the PIN has passed the expiry date and is no longer valid.
The same colour code formatting applies to the Passport and Visa expiry.
The Visa works slightly differently where if the staff member has a British/EU Passport, is EEA Dependent or Indefinite Leave, then the visa doesn't expire. You can also add additional Visa types by going to SetUp -> Check Database -> Lookup Tables and looking for 'LUpermitType' in the list. This table contains all the existing Visa types in the system. To add a new one, simply enter the name of the type in the first column (the LookupType column), then enter a number in the second column (the LookupDefault column) and then in the third and final column (the Expires column) enter 0 if you want the Visa type to expire (like a work or student Visa) or a -1 if you want the Visa to never expire (like an EU citizen).
Documents, Training, and Vaccinations
Documents, Training, and Vaccinations are located under the 'Documentation' tab of the Staff Details page.
Document Types, Training Types, and Vaccination Types are custom entered into the software. This allows for maximum flexibility for each company. To enter new Document, Training, or Vaccination types, click on the green header bar 'Documents', 'Training', or 'Vaccinations' (All of them work the same way). A list will be displayed of all the types already set up in the system. Each type entered can have its own expiry time in months. The expiry time is entered or changed by highlighting the type you want to edit, using the drop down box at the bottom right of the box, then selecting the number of months until expiry. New expiry months can be added by simply typing them into the box. You will need to press the Update button before closing the form.