Frequently Asked Question
Allocating staff to a booking
Last Updated 8 years ago
Main Menu / New Bookings
Useful Keys on your keyboard to Remember
At any time F5 on your keyboard will select these matches. You can also use the button highlighted in bright green to select matches.
On the right of your screen a list of matches will appear.
Matching staff are set in four sectors:
Under each sector there are 6 columns
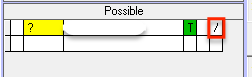
1st: Either Y or P or N
Y = Worked at Location Previously,
P = Preferred Location for that member of staff,
N = Not allowed to work at that Location
2nd Either Y or Y N or N or ?
There will be one character for each shift selected so if 3 shifts are selected there will be three characters. They will be in date order with the earliest date first.
Y = Bright Green Confirmed Available
Y = Light Green Availability is from the default availability on the staff record
N = Bright Red Confirmed as not available to work
N= Lighter Red Not available is from default availability.
? = Yellow No availability has been given by employee.
P = Orange is available but for only part of the shift (usually either 'Early' or 'Late')
3rd Employee Name.
Click on the employee name to bring up the employees work, availability and telephone number at the bottom of the screen.
Double Click to go to the staff record
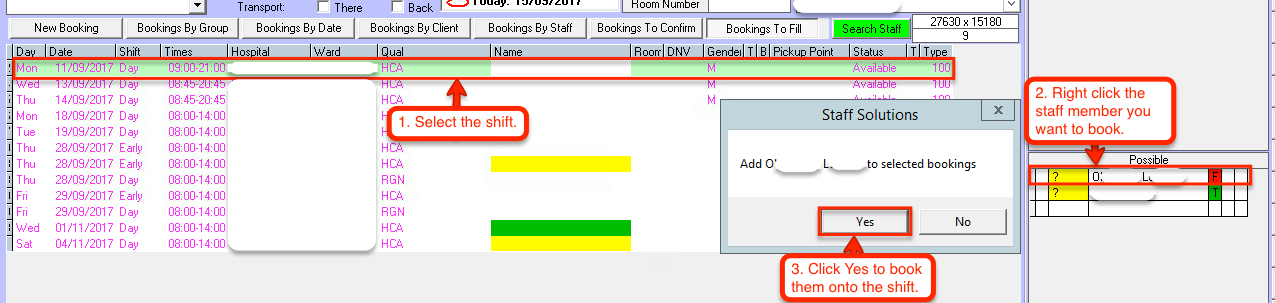
Right Click to add the staff member to the selected booking(s). If more than one shift is highlighted in green the member of staff will be added to all bookings
4th T or F
T = True Worked for you recently (the standard for this is 6 months)
F = False has not worked for you in the last 6 months
5th 'R' or 'N'
R = Staff member replies to Text Messages
N = Staff member does not reply to Text Messages
6th 'X' or '/'
X = Selected to send a Text
/ = Text has been sent
Updating Availability.
There are two ways within this screen to update availability.
Default Availability. On the Grey Menu Bar at the top of the screen select Bookings then Set Standard Availability or F3 on the keyboard. When default availability is set using this method, the availability will show in a paler green rather than the bright green. This then allows the User to see that this availability needs to be checked with the employee to ensure that the employee is actually available for this shift.
If you use default availability this should be updated weekly.
(Default availability is set on the staff record for each employee see Staff Record help sheets).
Update Actual Availability following an incoming text or telephone conversation.
When you have selected an employee the employees availability can be seen at the bottom of the screen. Each day of the week is split into 3 boxes, identified as 'Early' 'Late' and 'Night'. Early and Late together become a 'Long Day or a Day shift'.
At the start of the selection, and while holding the left mouse button down, drag across to complete the selection of weekdays for which you want to add availability. . Select from the coloured buttons below the description that fits the availability.
Any
Early
Late
Day
Twilight
Night
Refused
Sick
Holiday
Not Available
If you select 'Early' and then select ' Late' this will show in a turquoise colour and this colour identifies that the member of staff will work either an early or a late shift but not a 'Long Day'
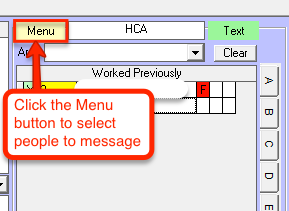
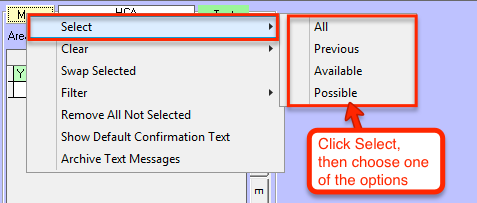
Using the Texting 'Menu'
Using the Menu button it is possible to select employees that have worked previously,
Those that are under the available list, and / or those that are on the possible list.
If you want to send a message to all the staff of that grade select 'All'.
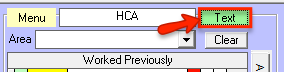
Once selected for a text message an X appears in the 6th Column. Individual staff members can be deselected simply by clicking on the staff member name and then selecting the 'X' in the 6th column.
The 'X' will then be cleared from the field

When the selection is as you require, press the Text Button.
The message that appears is a default message relating to the shifts that are currently selected. This message can be altered to reflect any suitable message, ie:
‘We have shifts available for this week please text your availability’
The number of character (129 in this screen shot) identifies the length of the message. SMS messages
are limited by providers to 160 characters, if messages are longer they will be split by the provider into 2 or more messages and will subsequently take longer to send.
The box on the right will list the names of the employees to receive the message and underneath next to the box 'Total Staff to Send SMS' will give you the number of staff that you will be sending the message.
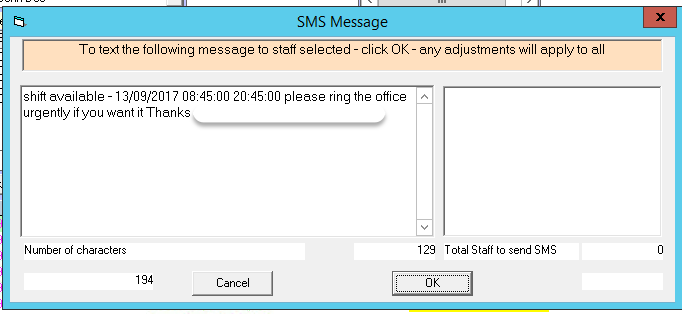
When you click on the OK button, the message in the box will be sent to all employees with an X in column 6, providing that they have a mobile phone number. The ‘X’ will then be replaced by ‘/’ when the message has been sent. Pulse will tell you of any staff that do not have mobile numbers.
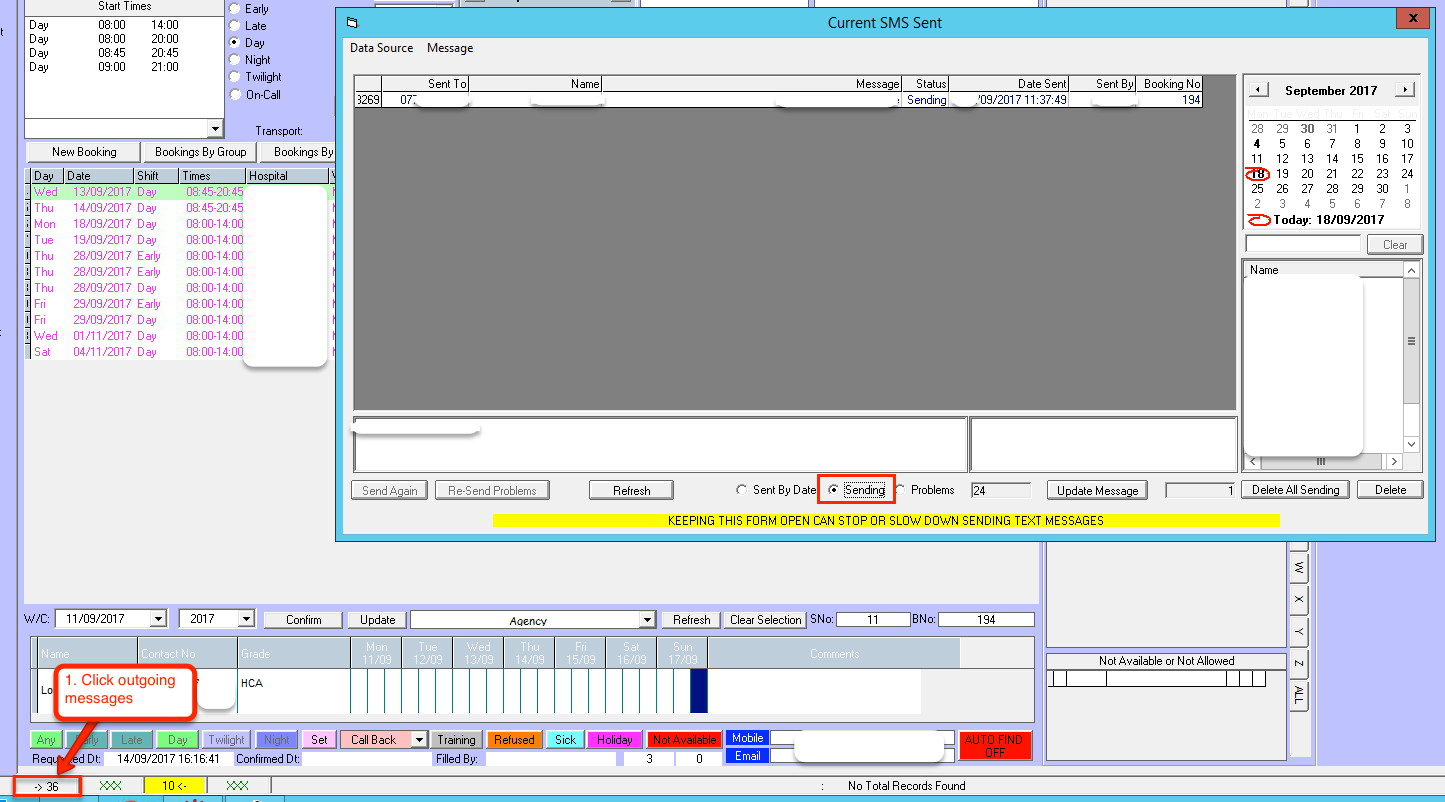
To see the messages sent click on Sent Texts at the bottom left of your screen immediately to the left of the unread texts button. Then click on Sending
To Select a member of Staff to Fill the Selected Booking(s)
Click on the employees name. Right click with the mouse, and answer yes when prompted.
To Remove a member of Staff from the Selected Booking(s)
This facility is not available when entering new bookings if you have added a member of staff by mistake when entering New Bookings you will need to change to the 'Bookings by Staff' tab to remove the member of staff from a booking.
Select the booking so that it is highlighted in green. Right click the mouse in the area of the selected booking. A sub menu will appear, select one of the following :
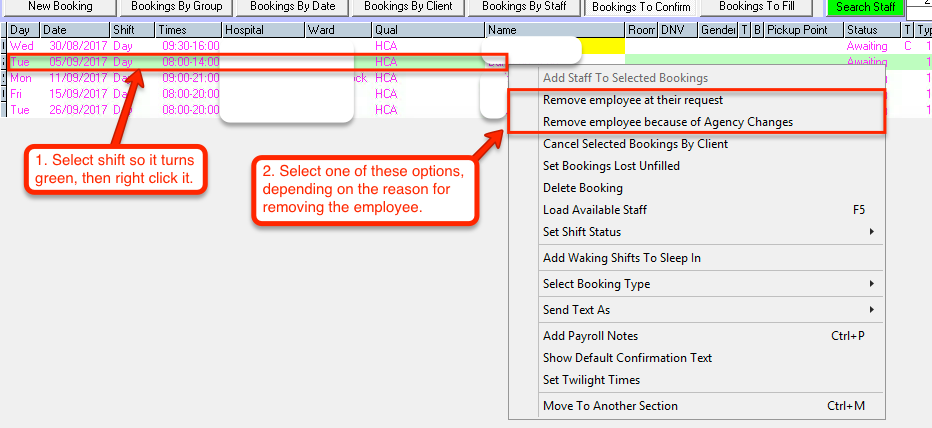
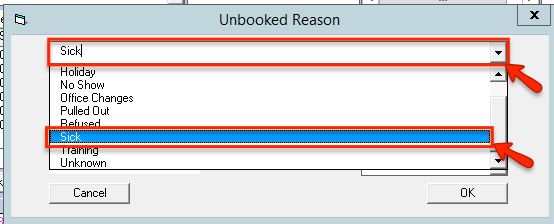
Once an employee has been allocated to a booking, a reason needs to be entered for the employee to be removed from the booking, this is used for reporting purposes. Select this from the drop down box.
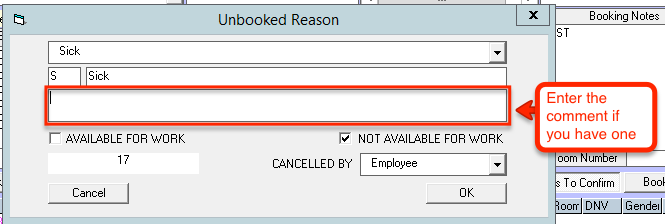
There is also a box to fill in any other comments relating to the removal of this employee from the shift.
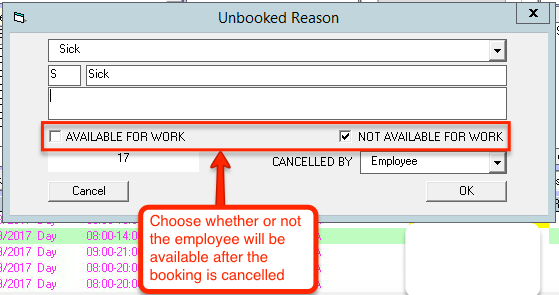
Select also whether the employee is still available for work.
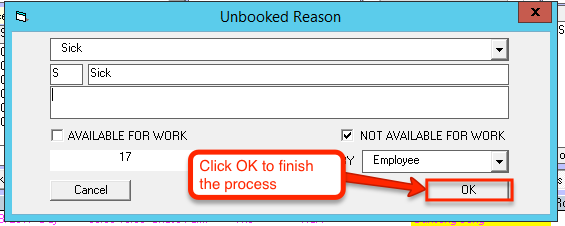
A message box will pop up asking if you want to send a cancellation text to the employee. Click yes to send the text, or click no to continue.

Useful Keys on your keyboard to Remember
- ‘F5’ Loads a selection of employees when shift(s) have been selected.
- ‘Alt’ Hold the Alt key down to select multiple shifts
- ‘Del’ Will delete the selected shift from new bookings providing they have not had a member of staff allocated to the shift
- Left Click to move from one field to the next
- Right Click on a member of staff to add to the selected booking(s)
- Double Click on a member of staff to go to the staff record.
- Right Click on selected booking(s) to get a menu of options for the highlighted booking.
At any time F5 on your keyboard will select these matches. You can also use the button highlighted in bright green to select matches.
On the right of your screen a list of matches will appear.
Matching staff are set in four sectors:
- Worked at Client Location Previously
- Available to Work but have not worked at this Location previously
- Possible (No Availability given and have not worked at this Location previously).
- Not Available or Not Allowed to work at this Location.
- If there is an 'N' in the first column the employee is definitely not allowed to work at this location.
Under each sector there are 6 columns
1st: Either Y or P or N
Y = Worked at Location Previously,
P = Preferred Location for that member of staff,
N = Not allowed to work at that Location
2nd Either Y or Y N or N or ?
There will be one character for each shift selected so if 3 shifts are selected there will be three characters. They will be in date order with the earliest date first.
Y = Bright Green Confirmed Available
Y = Light Green Availability is from the default availability on the staff record
N = Bright Red Confirmed as not available to work
N= Lighter Red Not available is from default availability.
? = Yellow No availability has been given by employee.
P = Orange is available but for only part of the shift (usually either 'Early' or 'Late')
3rd Employee Name.
Click on the employee name to bring up the employees work, availability and telephone number at the bottom of the screen.
Double Click to go to the staff record
Right Click to add the staff member to the selected booking(s). If more than one shift is highlighted in green the member of staff will be added to all bookings
4th T or F
T = True Worked for you recently (the standard for this is 6 months)
F = False has not worked for you in the last 6 months
5th 'R' or 'N'
R = Staff member replies to Text Messages
N = Staff member does not reply to Text Messages
6th 'X' or '/'
X = Selected to send a Text
/ = Text has been sent
Updating Availability.
There are two ways within this screen to update availability.
Default Availability. On the Grey Menu Bar at the top of the screen select Bookings then Set Standard Availability or F3 on the keyboard. When default availability is set using this method, the availability will show in a paler green rather than the bright green. This then allows the User to see that this availability needs to be checked with the employee to ensure that the employee is actually available for this shift.
If you use default availability this should be updated weekly.
(Default availability is set on the staff record for each employee see Staff Record help sheets).
Update Actual Availability following an incoming text or telephone conversation.
When you have selected an employee the employees availability can be seen at the bottom of the screen. Each day of the week is split into 3 boxes, identified as 'Early' 'Late' and 'Night'. Early and Late together become a 'Long Day or a Day shift'.
At the start of the selection, and while holding the left mouse button down, drag across to complete the selection of weekdays for which you want to add availability. . Select from the coloured buttons below the description that fits the availability.
Any
Early
Late
Day
Twilight
Night
Refused
Sick
Holiday
Not Available
If you select 'Early' and then select ' Late' this will show in a turquoise colour and this colour identifies that the member of staff will work either an early or a late shift but not a 'Long Day'
Using the Texting 'Menu'
Using the Menu button it is possible to select employees that have worked previously,
Those that are under the available list, and / or those that are on the possible list.
If you want to send a message to all the staff of that grade select 'All'.
Once selected for a text message an X appears in the 6th Column. Individual staff members can be deselected simply by clicking on the staff member name and then selecting the 'X' in the 6th column.
The 'X' will then be cleared from the field
When the selection is as you require, press the Text Button.
The message that appears is a default message relating to the shifts that are currently selected. This message can be altered to reflect any suitable message, ie:
‘We have shifts available for this week please text your availability’
The number of character (129 in this screen shot) identifies the length of the message. SMS messages
are limited by providers to 160 characters, if messages are longer they will be split by the provider into 2 or more messages and will subsequently take longer to send.
The box on the right will list the names of the employees to receive the message and underneath next to the box 'Total Staff to Send SMS' will give you the number of staff that you will be sending the message.
When you click on the OK button, the message in the box will be sent to all employees with an X in column 6, providing that they have a mobile phone number. The ‘X’ will then be replaced by ‘/’ when the message has been sent. Pulse will tell you of any staff that do not have mobile numbers.
To see the messages sent click on Sent Texts at the bottom left of your screen immediately to the left of the unread texts button. Then click on Sending
To Select a member of Staff to Fill the Selected Booking(s)
Click on the employees name. Right click with the mouse, and answer yes when prompted.
To Remove a member of Staff from the Selected Booking(s)
This facility is not available when entering new bookings if you have added a member of staff by mistake when entering New Bookings you will need to change to the 'Bookings by Staff' tab to remove the member of staff from a booking.
Select the booking so that it is highlighted in green. Right click the mouse in the area of the selected booking. A sub menu will appear, select one of the following :
- ‘Remove employee at their request’
- 'Remove employee because of agency changes'
- 'Cancel Selected Booking by Client'
Once an employee has been allocated to a booking, a reason needs to be entered for the employee to be removed from the booking, this is used for reporting purposes. Select this from the drop down box.
There is also a box to fill in any other comments relating to the removal of this employee from the shift.
Select also whether the employee is still available for work.
A message box will pop up asking if you want to send a cancellation text to the employee. Click yes to send the text, or click no to continue.