Frequently Asked Question
I can't find a staff member's timesheet in the Wages section
Last Updated 9 years ago
If you have recently processed a timesheet and it hasn't appeared in the wages section, there are a couple of things you can check.
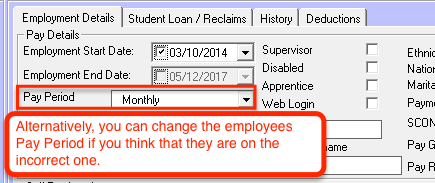
First, make sure that the Pay Frequency selected is the Pay Frequency of the staff member who worked on that shift. To do this, go to the staff members staff details page, then go to Pay Information. Under the Employment Details tab there is a drop down box labelled 'Pay Period'.
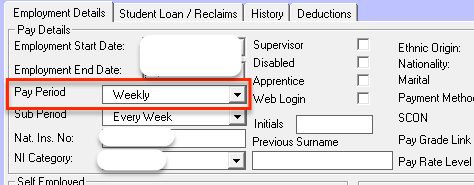
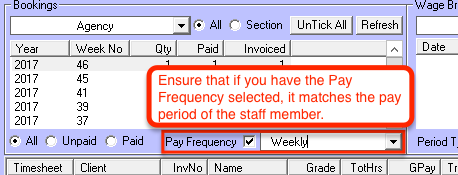
Cross check on the Wages screen that the Pay Frequency you have selected is the same as the staff members pay period.
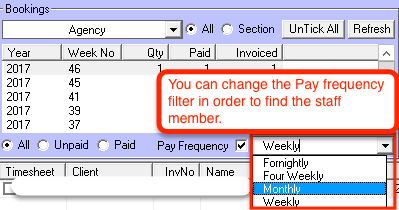
If it's not, you can either change the pay frequency filter on the Wages screen
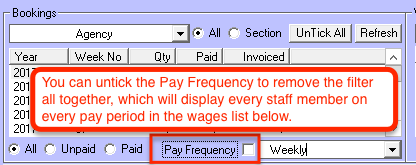
Completely remove the filter by unchecking the Pay Frequency box
Or you can amend the staff members pay period if they are on the incorrect one by changing it and clicking the Save button.
When you make either of these changes and go back to the Wages screen and refresh, the timesheet should now be showing up and ready to be sent through to PaySlips.
Another potential issue to check for is that the timesheet wasn't processed as 'Do Not Pay'. This will result in the timesheet having 'Zero' values, unlike the other shifts in the list.

The timesheet could've been set to Do Not Pay either by accident when it was being processed, or by default if the staff member's employment type is set to 'Staff'. The 'Staff' employment type is reserved for agency office staff, and not agency workers, so the system works off a Salary rather than a shift work basis. As a result, any shifts that an employee with the employment type as 'Staff' will have any shift they work set as 'Do Not Pay' by default.
You can stop this by correcting their employment type in the staff details page, then reprocessing the timesheet so that it uses the correct settings.
SS
Alternatively, you can temporarily fix the Do Not Pay by going to the Staff Work History reports page.

Once you're there, search for the timesheet by clicking the 'Search by timesheet number' option and entering in the timesheet number of the shift you want to fix.

In the box in the centre of the screen the shifts should now appear. Select the shifts that are set as 'Do Not Pay' and click the 'Reset Do Not Pay' button in the bottom right of the screen.
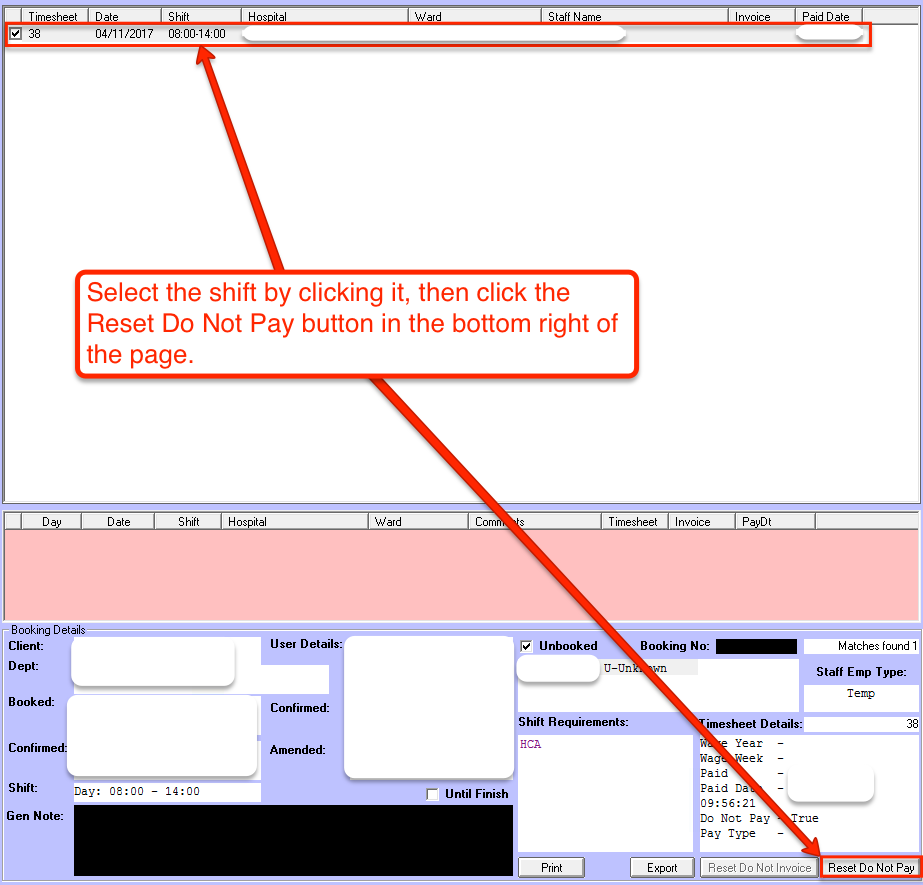
After you have clicked the Reset Do Not Pay button it will no longer appear in the list in the centre.
When you now go back to the Wages screen and refresh the list, the shift that was previously set as Do Not Pay is now displaying the correct pay values.

A further potential reason could be that when the booking was made, the shift was manually set to 'Complete' instead of being confirmed in the correct way. Setting the shift to 'Complete' makes the shift completely miss the Timesheet process, and therefore the Wages process due 'Complete' meaning that the Timesheet has been processed.
One way to check this is to first find the booking you made and check what the status is, if it's 'Confirmed', it means that it is still sitting in the Timesheets screen waiting to be processed. When you then process the Timesheet it will correctly progress to the Wages section. This is the correct process for a shift. It should never be set to 'Complete' manually.
If it's 'Complete' then it means that it has gone through the Timesheets process, and is sitting in Wages waiting to be sent to the Payroll week. If you then check the Wages screen and it is not there, and it is not in the current payroll week, it means that the shift was likely manually set to 'Complete' by whoever created the booking.
If you're completely sure that the shift has been manually set to 'Complete', you can ensure it goes through the correct process by going to the Booking Report screen,

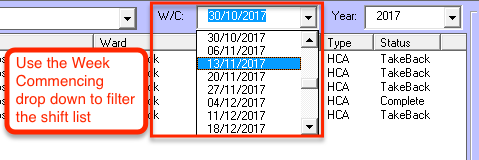
then finding the shift using the Week Commencing date (W/C),
then going to File -> Reset Status -> Confirmed. This will then ensure the shift is in the Timesheets screen waiting to be processed correctly. (Please note that it is very important that you are 100% sure that the shift has not yet been processed or paid, as using this method on a shift that has been processed and paid correctly will result in a duplication error when processing the timesheet)

When the booking has been set to 'Confirmed', it is returned back to the Timesheets stage. When you go to the Timesheets page, you can now process it and it will go through the process correctly.

The Incorrect Pay Frequency Has Been Selected, or the Staff Member Has Been Set to the Incorrect Pay Period
First, make sure that the Pay Frequency selected is the Pay Frequency of the staff member who worked on that shift. To do this, go to the staff members staff details page, then go to Pay Information. Under the Employment Details tab there is a drop down box labelled 'Pay Period'.
Cross check on the Wages screen that the Pay Frequency you have selected is the same as the staff members pay period.
If it's not, you can either change the pay frequency filter on the Wages screen
Completely remove the filter by unchecking the Pay Frequency box
Or you can amend the staff members pay period if they are on the incorrect one by changing it and clicking the Save button.
When you make either of these changes and go back to the Wages screen and refresh, the timesheet should now be showing up and ready to be sent through to PaySlips.
The Shift Has Been Set as 'Do Not Pay'
Another potential issue to check for is that the timesheet wasn't processed as 'Do Not Pay'. This will result in the timesheet having 'Zero' values, unlike the other shifts in the list.
The timesheet could've been set to Do Not Pay either by accident when it was being processed, or by default if the staff member's employment type is set to 'Staff'. The 'Staff' employment type is reserved for agency office staff, and not agency workers, so the system works off a Salary rather than a shift work basis. As a result, any shifts that an employee with the employment type as 'Staff' will have any shift they work set as 'Do Not Pay' by default.
You can stop this by correcting their employment type in the staff details page, then reprocessing the timesheet so that it uses the correct settings.
SS
Alternatively, you can temporarily fix the Do Not Pay by going to the Staff Work History reports page.
Once you're there, search for the timesheet by clicking the 'Search by timesheet number' option and entering in the timesheet number of the shift you want to fix.
In the box in the centre of the screen the shifts should now appear. Select the shifts that are set as 'Do Not Pay' and click the 'Reset Do Not Pay' button in the bottom right of the screen.
After you have clicked the Reset Do Not Pay button it will no longer appear in the list in the centre.
When you now go back to the Wages screen and refresh the list, the shift that was previously set as Do Not Pay is now displaying the correct pay values.
The Booking Was Manually Set as 'Complete' By Someone
A further potential reason could be that when the booking was made, the shift was manually set to 'Complete' instead of being confirmed in the correct way. Setting the shift to 'Complete' makes the shift completely miss the Timesheet process, and therefore the Wages process due 'Complete' meaning that the Timesheet has been processed.
One way to check this is to first find the booking you made and check what the status is, if it's 'Confirmed', it means that it is still sitting in the Timesheets screen waiting to be processed. When you then process the Timesheet it will correctly progress to the Wages section. This is the correct process for a shift. It should never be set to 'Complete' manually.
If it's 'Complete' then it means that it has gone through the Timesheets process, and is sitting in Wages waiting to be sent to the Payroll week. If you then check the Wages screen and it is not there, and it is not in the current payroll week, it means that the shift was likely manually set to 'Complete' by whoever created the booking.
If you're completely sure that the shift has been manually set to 'Complete', you can ensure it goes through the correct process by going to the Booking Report screen,
then finding the shift using the Week Commencing date (W/C),
then going to File -> Reset Status -> Confirmed. This will then ensure the shift is in the Timesheets screen waiting to be processed correctly. (Please note that it is very important that you are 100% sure that the shift has not yet been processed or paid, as using this method on a shift that has been processed and paid correctly will result in a duplication error when processing the timesheet)
When the booking has been set to 'Confirmed', it is returned back to the Timesheets stage. When you go to the Timesheets page, you can now process it and it will go through the process correctly.