Frequently Asked Question
How can I update a section?
Last Updated 9 years ago
If you at some point need to add a new shift type to an already existing section, you must first go to the SetUp menu then navigate to the Edit Section window.

Within this window, you should see the SetUp of the current section you are in. Before adding a new shift type, you need to ensure you understand what the ShiftOrder column means and be careful not to interfere with any existing shift types. The ShiftOrder column must always start at 0, then sequentially progress through (e.g. if you have 5 shift types, the ShiftOrder column must start at 0 then end at 4, ensuring that the numbers aren't mixed up or duplicated (0, 1, 2, 3, 4))
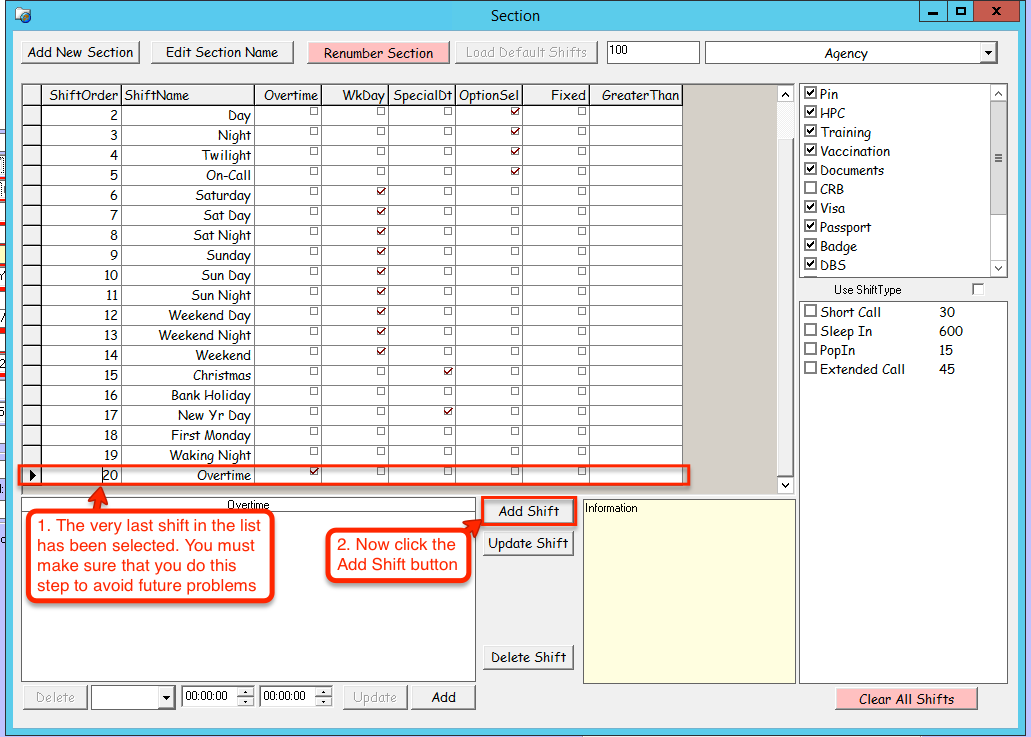
To add a new shift type, first ensure that you have selected the final shift in the already existing list, then click the Add Shift button. (The last shift must be selected so that when you click the Add Shift button the new shift is automatically created at the bottom of the table, instead of being somewhere in the middle which could cause problems with already existing shifts if not done correctly). We will be changing this later, but having the new shift as the latest entry into the table makes it easier to follow.
The new shift has now been added to the list. As you can see, the ShiftOrder number has been automatically filled in.

If the new shift has appeared in a seemingly random location within the table it means that you did not select the final shift type in the list, and therefore the new shift type was added under another shift type. If this has happened, you will either need to delete the newly added shift by selecting it and clicking the Delete Shift button.
Or you will need to renumber all shifts after that one to make sure they are in sequence. Adding a shift at a random point in the list causes a duplicate ShiftOrder number and leaves the existing shift types after the newly added one with the incorrect numbers.
Now that the new shift type has been added, you will need to overwrite the default '' with a name of your choosing. To do this, simply delete the from the cell and type in the new shift name.

After you have typed in the shift name, you may notice a pencil icon in the grey row on the left. This means that you are currently editing that record and it has not yet been saved to the database. To save your changes, simply click your mouse on another row.


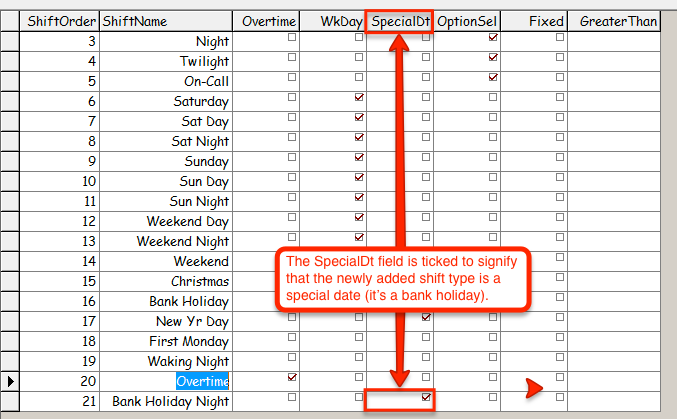
Now that the new shift type record has been entered and saved, you can input the details of that shift type, e.g. if it's considered Overtime, a Week Day, a Special Date such as a holiday, or if the shift will be a fixed value regardless of how many hours the nurse works it. You can see the various options along the top row, to set your shift as one of those options you just tick the box, and click off the field to save the update, as shown previously.
(Refer to the help article 'How can I add a new Section' for more information on each of the options)
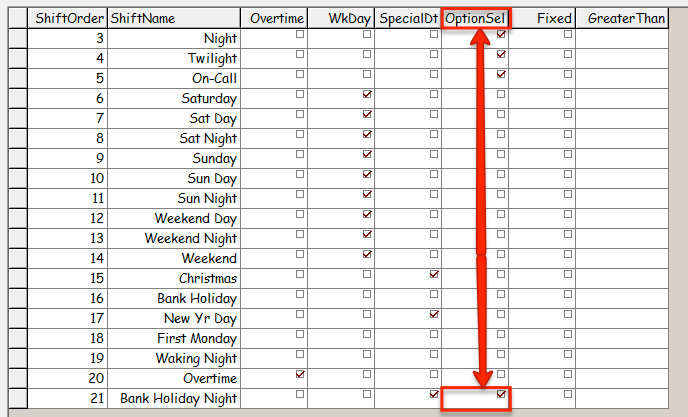
The next part is to tick the 'OptionSel' field. This field sets the new shift type as a default shift type within the system, meaning that whenever you put a booking on, this new shift type will show up as an available shift to book.
The final step is to ensure that the newly added shift sits right under the last OptionSel shift type. All of these shift types must be grouped together otherwise the system will not recognise the shift. To do this you must change the ShiftOrder number to the be the number following the last OptionSel shift.
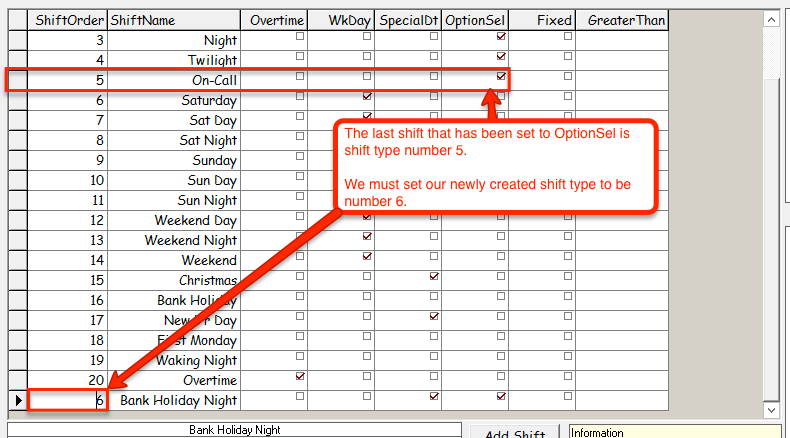
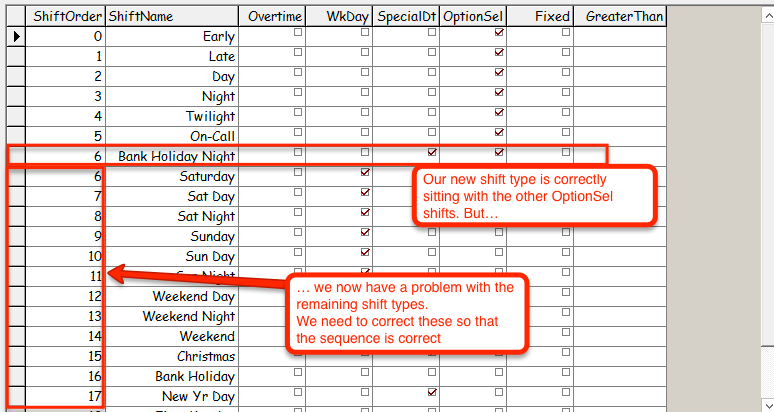
You must now close and reopen the Edit Section window to refresh the table. As you can see, we now have the newly created shift type sitting below the other shifts that are set to OptionSel. As you can see though, we now have a duplicate of shift types with number 6 (Our newly created one, and the previous one). We must now correct all of the other shift numbers so that the sequence is correct.
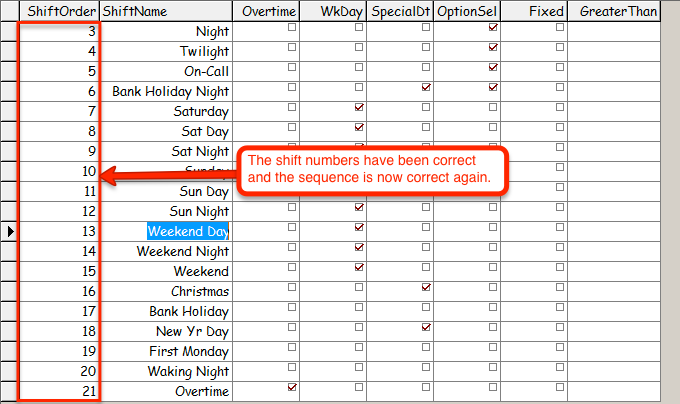
Now that the numbers have been corrected, the shift has been succesfully added, and you should now see it appear on the Create Bookings screen.
Within this window, you should see the SetUp of the current section you are in. Before adding a new shift type, you need to ensure you understand what the ShiftOrder column means and be careful not to interfere with any existing shift types. The ShiftOrder column must always start at 0, then sequentially progress through (e.g. if you have 5 shift types, the ShiftOrder column must start at 0 then end at 4, ensuring that the numbers aren't mixed up or duplicated (0, 1, 2, 3, 4))
To add a new shift type, first ensure that you have selected the final shift in the already existing list, then click the Add Shift button. (The last shift must be selected so that when you click the Add Shift button the new shift is automatically created at the bottom of the table, instead of being somewhere in the middle which could cause problems with already existing shifts if not done correctly). We will be changing this later, but having the new shift as the latest entry into the table makes it easier to follow.
The new shift has now been added to the list. As you can see, the ShiftOrder number has been automatically filled in.
If the new shift has appeared in a seemingly random location within the table it means that you did not select the final shift type in the list, and therefore the new shift type was added under another shift type. If this has happened, you will either need to delete the newly added shift by selecting it and clicking the Delete Shift button.
Or you will need to renumber all shifts after that one to make sure they are in sequence. Adding a shift at a random point in the list causes a duplicate ShiftOrder number and leaves the existing shift types after the newly added one with the incorrect numbers.
Now that the new shift type has been added, you will need to overwrite the default '' with a name of your choosing. To do this, simply delete the from the cell and type in the new shift name.
After you have typed in the shift name, you may notice a pencil icon in the grey row on the left. This means that you are currently editing that record and it has not yet been saved to the database. To save your changes, simply click your mouse on another row.
Now that the new shift type record has been entered and saved, you can input the details of that shift type, e.g. if it's considered Overtime, a Week Day, a Special Date such as a holiday, or if the shift will be a fixed value regardless of how many hours the nurse works it. You can see the various options along the top row, to set your shift as one of those options you just tick the box, and click off the field to save the update, as shown previously.
(Refer to the help article 'How can I add a new Section' for more information on each of the options)
The next part is to tick the 'OptionSel' field. This field sets the new shift type as a default shift type within the system, meaning that whenever you put a booking on, this new shift type will show up as an available shift to book.
The final step is to ensure that the newly added shift sits right under the last OptionSel shift type. All of these shift types must be grouped together otherwise the system will not recognise the shift. To do this you must change the ShiftOrder number to the be the number following the last OptionSel shift.
You must now close and reopen the Edit Section window to refresh the table. As you can see, we now have the newly created shift type sitting below the other shifts that are set to OptionSel. As you can see though, we now have a duplicate of shift types with number 6 (Our newly created one, and the previous one). We must now correct all of the other shift numbers so that the sequence is correct.
Now that the numbers have been corrected, the shift has been succesfully added, and you should now see it appear on the Create Bookings screen.