Frequently Asked Question
Availability List ( for Filling shifts from a supplier list and only updating shifts that can definitely be filled)
Last Updated 8 years ago
This screen is best suited for companies that are emailed lists from the NHS of shift requirements. It is possible from this screen to look for staff using a supplied list or email and only update shifts that can definitely be filled instantly.
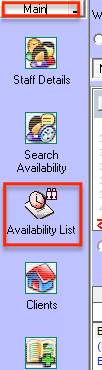
Go to 'Main' menu then 'Availability List'
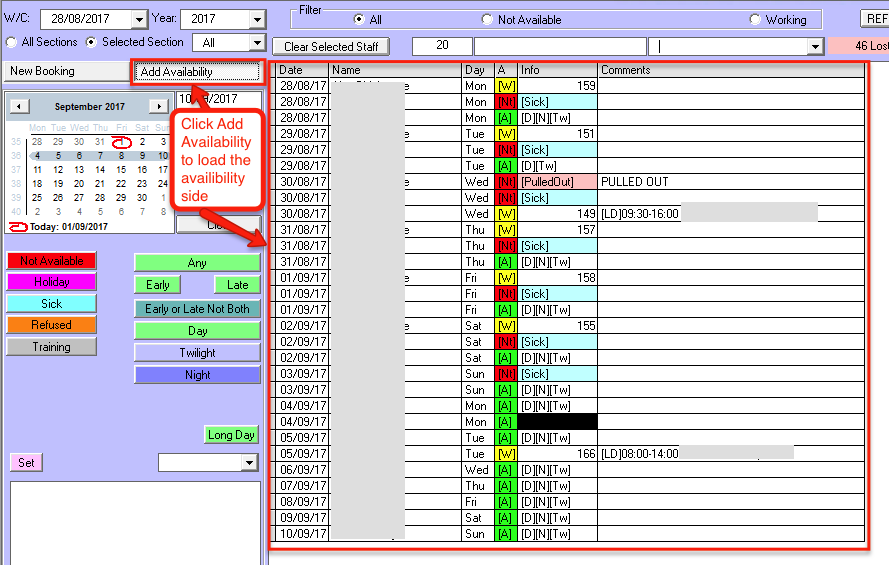
Click the Add Availability button to load the availability side of this page, click the New Booking button to load the booking side of this page.
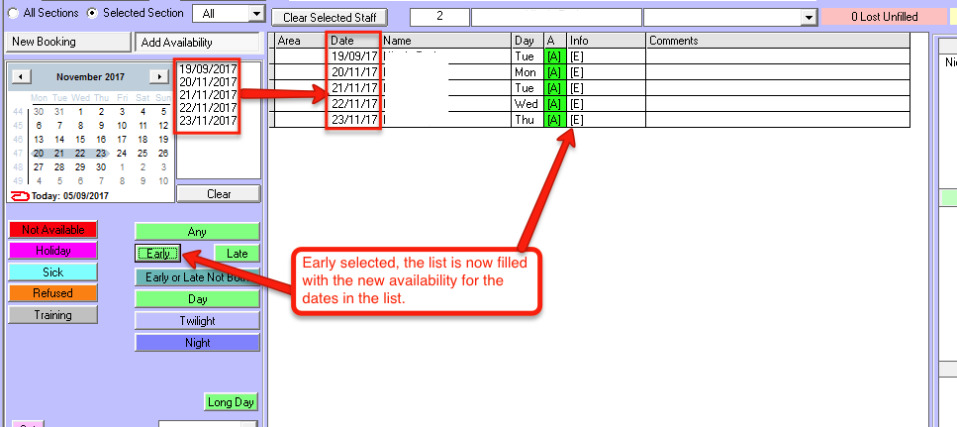
Select the date, or dates you want to add availability for. to do this select each date individually from the calendar, the date will appear in the list to the right., or click on the first date and holding the left mouse button down drag across to the last date.
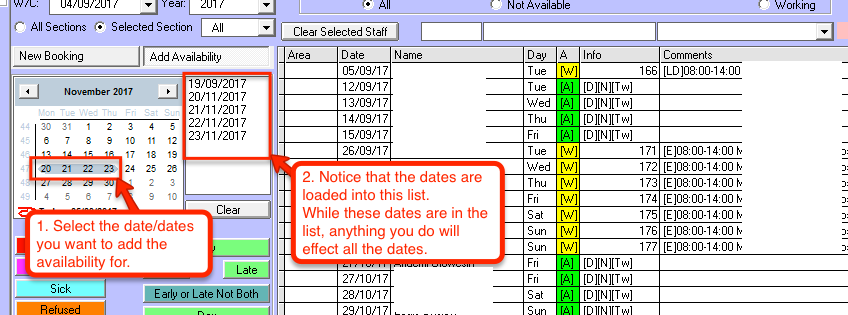
The list containing the dates next to the calendar are dates that have been selected. Any changes you make from this point on will apply to all of the dates in that list. Make sure you've selected the correct dates. If you need to remove a date from the list, click the date again on the calendar it will then be removed from the list.
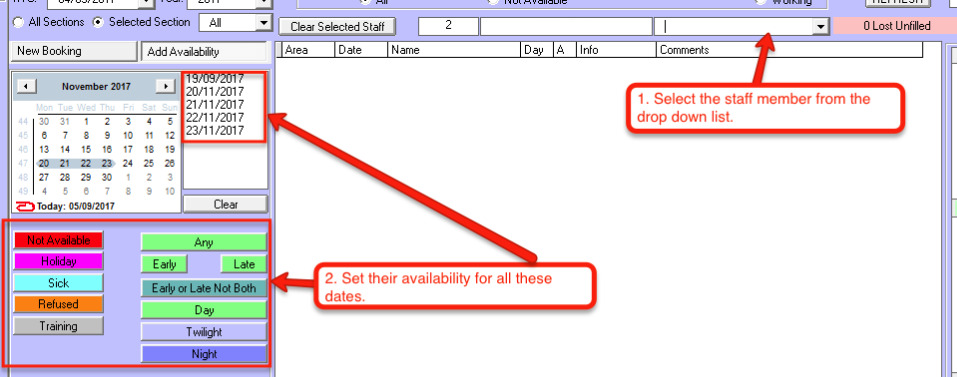
Select the staff member from the drop down list, then select an availability.
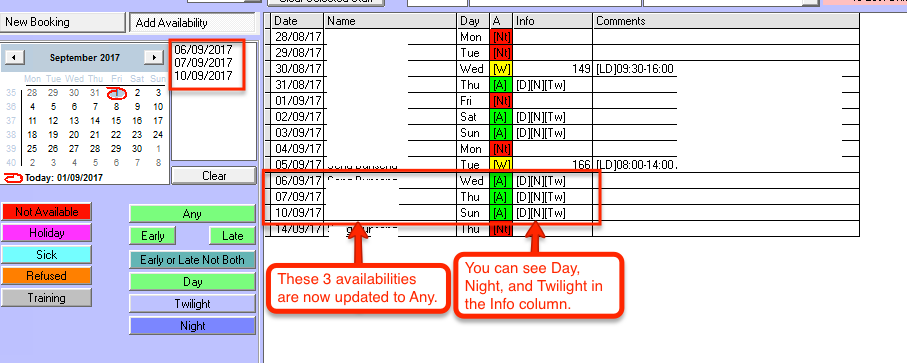
After Early is clicked, 5 new availability entries are created for the staff member we selected corresponding to the dates we selected. If you select 'Any' the screen will reply with a green 'A' for available followed by (D) (N) (Twilight)
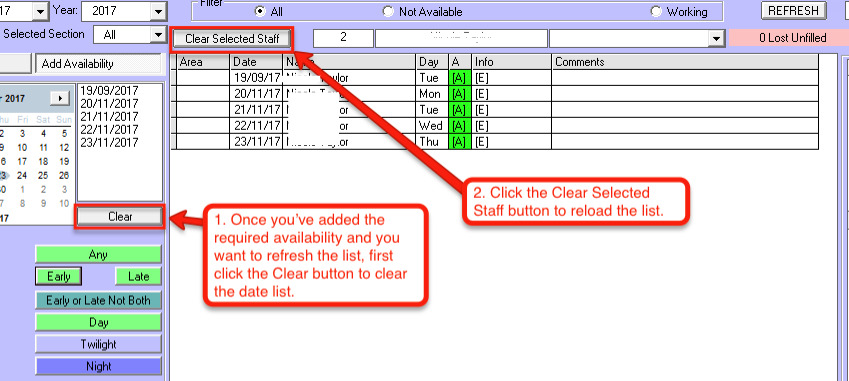
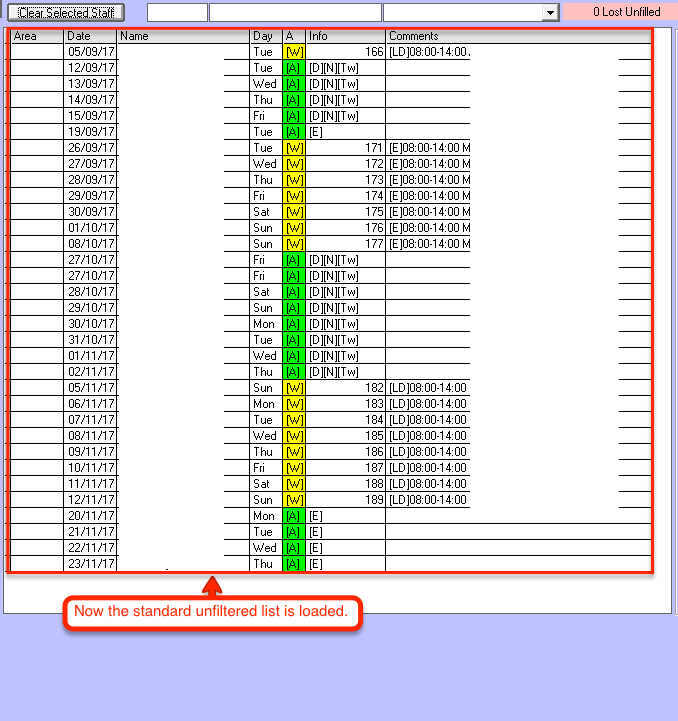
When you want to return to the unfiltered list, you need to clear the date list and the selected staff.
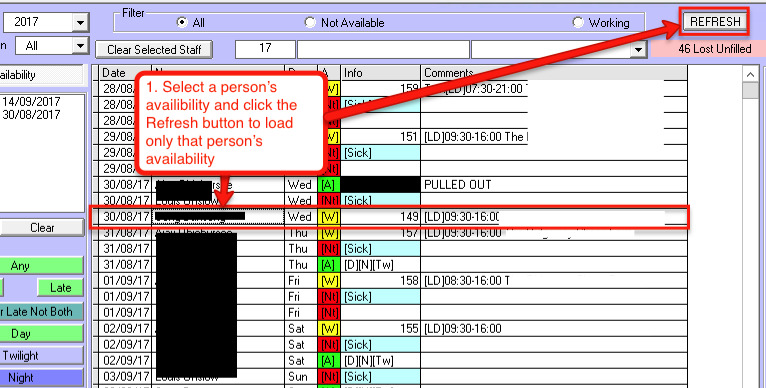
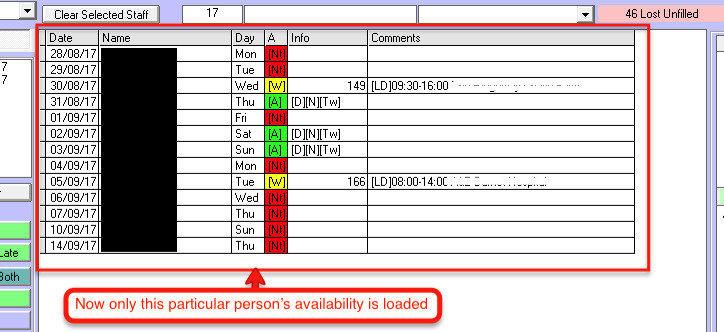
When the list refreshes the only availabilities that load will be the one particular person that you filtered by.
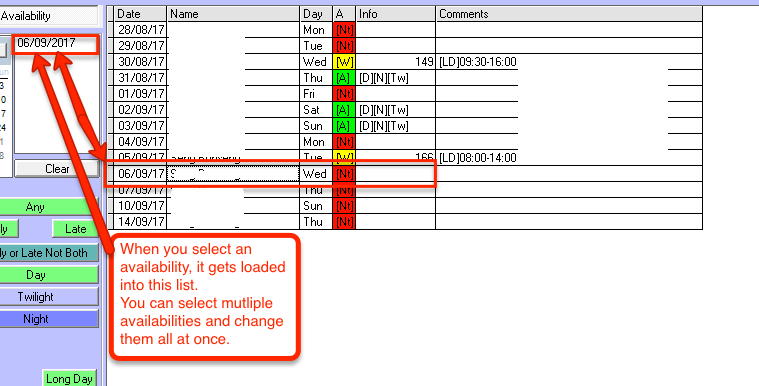
On this page, when you select an availability entry, it loads it into this list. Using this list you can select multiple availabilities at a time and change them all at once.

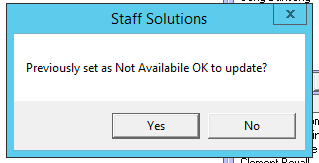
A warning message will appear asking you to confirm if the availability is OK to update. (Note: This message box will pop up for each item in the list)
As you can see, the three availabilities that were selected in the list have now been updated to Any.
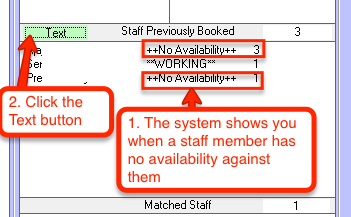
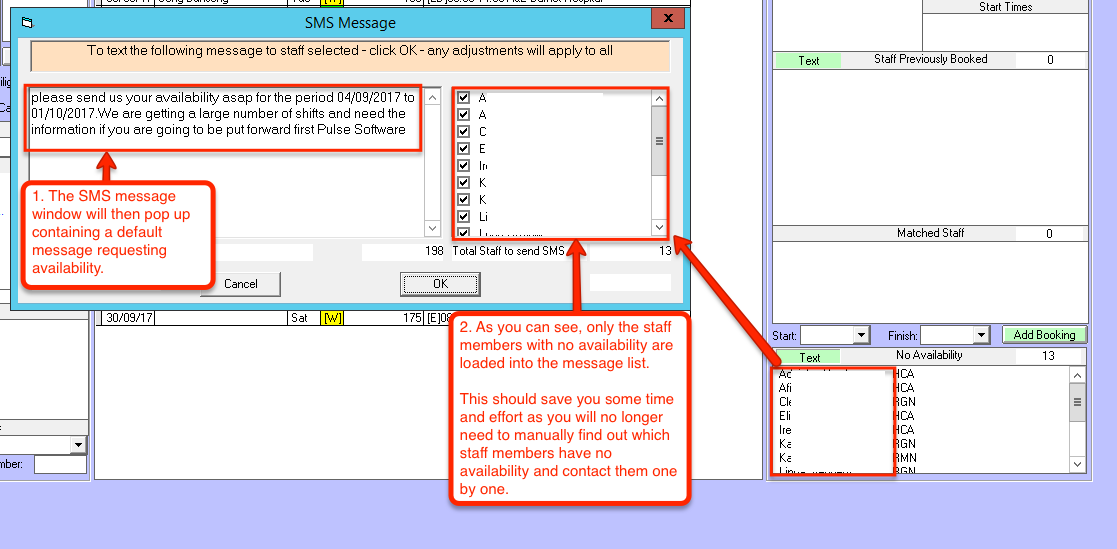
Under previously booked staff, there is a warning message applied to a staff member when they have no availability in the system. This comes in useful when it comes to the bookings side, to ensure that you’re not blindly booking people into shifts without knowing if they will be available or not. If you click the Text button, the Text Message window will appear loading the staff who have no availability into the message list. From here you can send a message out to the staff members who have no availability asking them to get it to you ASAP.
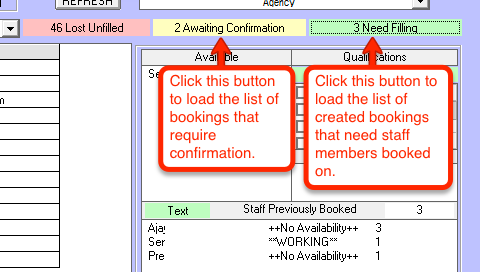
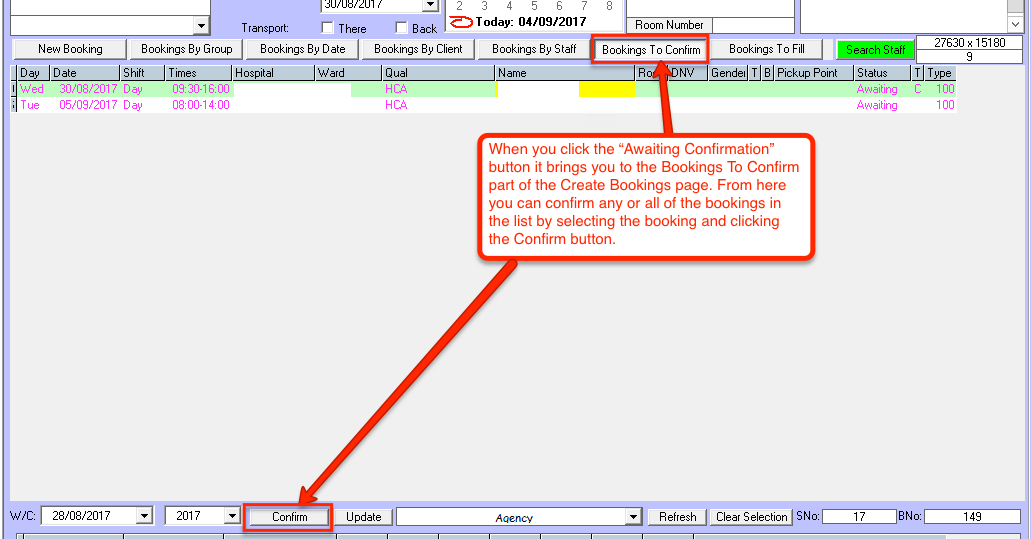
Clicking Awaiting Confirmation brings you to the Bookings to Confirm tab of the Create Bookings page. From here you can confirm any bookings you need to by selecting them and clicking the Confirm button.
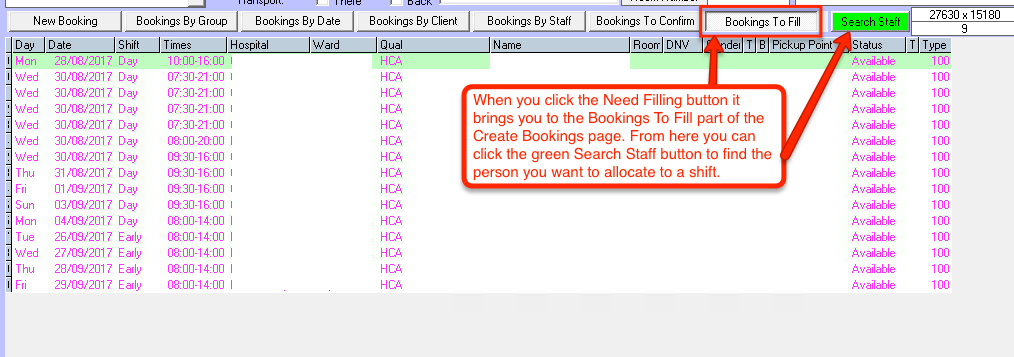
Clicking the Need Filling button brings you to the Bookings To Fill part of the Create Bookings page. From here you can fill any empty bookings you need by clicking the Search Staff button.
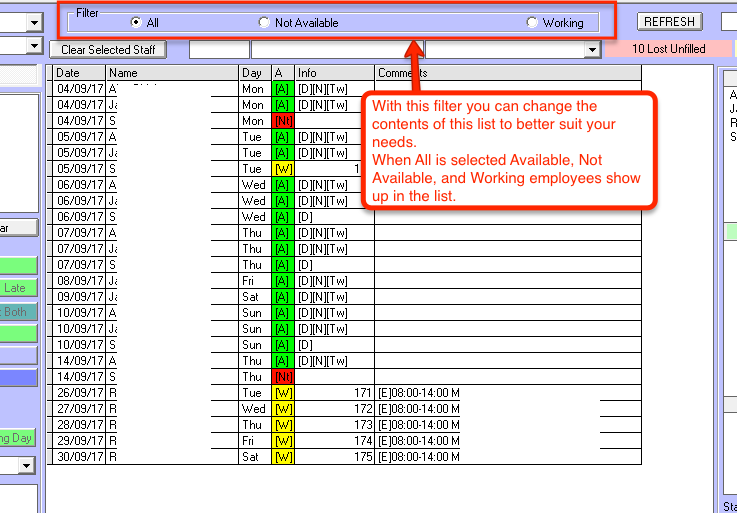
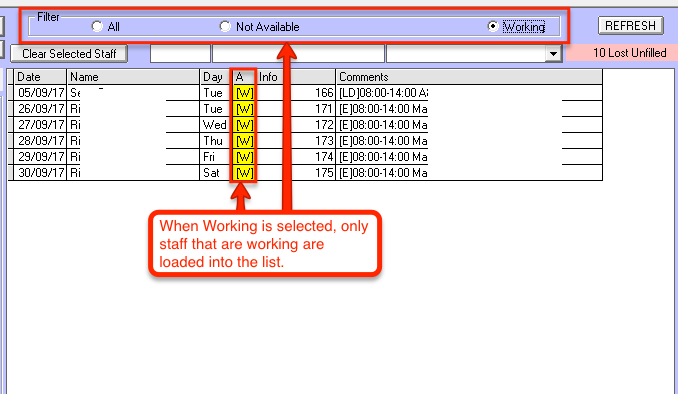
The filter near the top of the window allows you to show all staff, not available staff, and working staff.

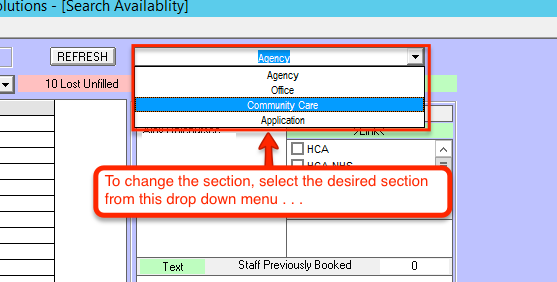
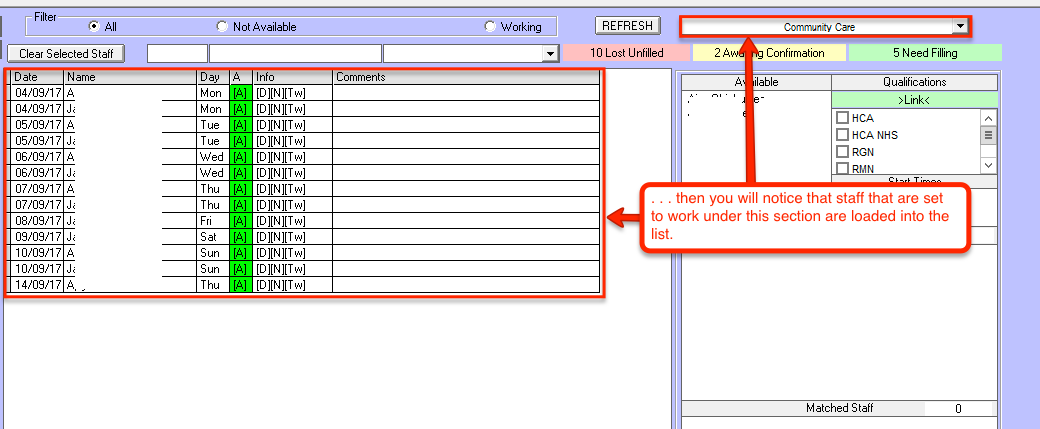
You can change the section that you’re working in by choosing it from the drop down menu in the top right of the page.
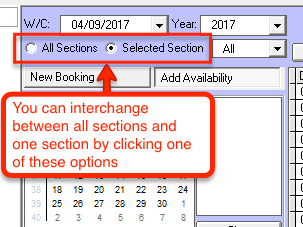
You can also choose to view staff from all sections, or just the section you’re currently in by choosing one of these options.
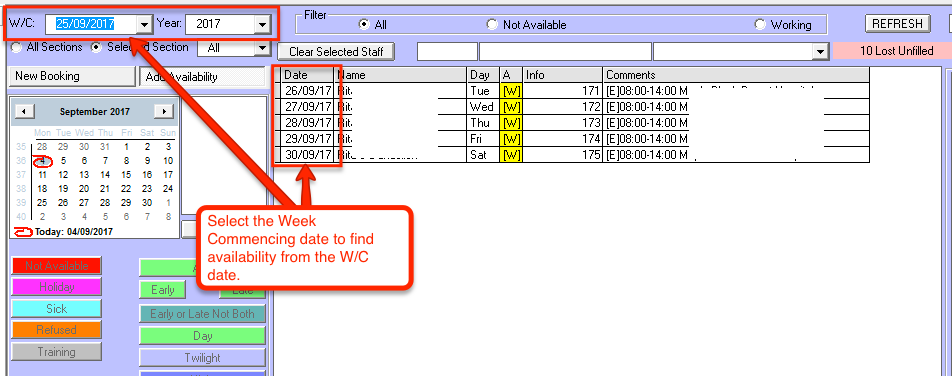
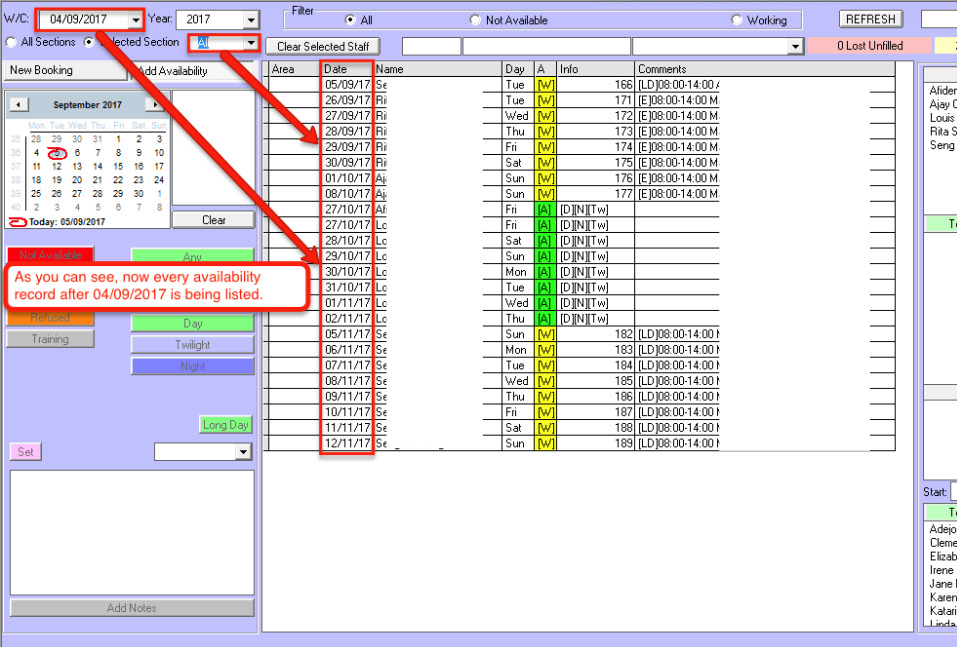
You can select the week commencing date to find availability from a specified date period. Change the W/C field to the Monday date of the week you’re looking for and the list will automatically reload with availability from that particular date onward. In this case, from the 25th of September 2017.
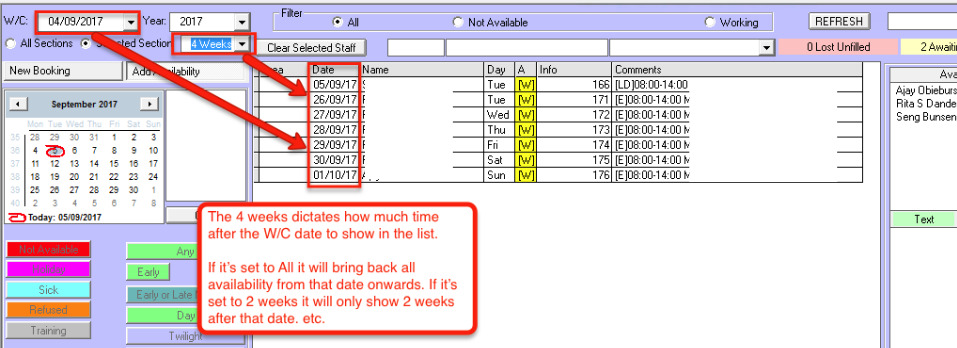
To set how long after the W/C date to display records, you can change the All drop down menu to 1 weeks, 2 weeks, 3 weeks, or 4 weeks.
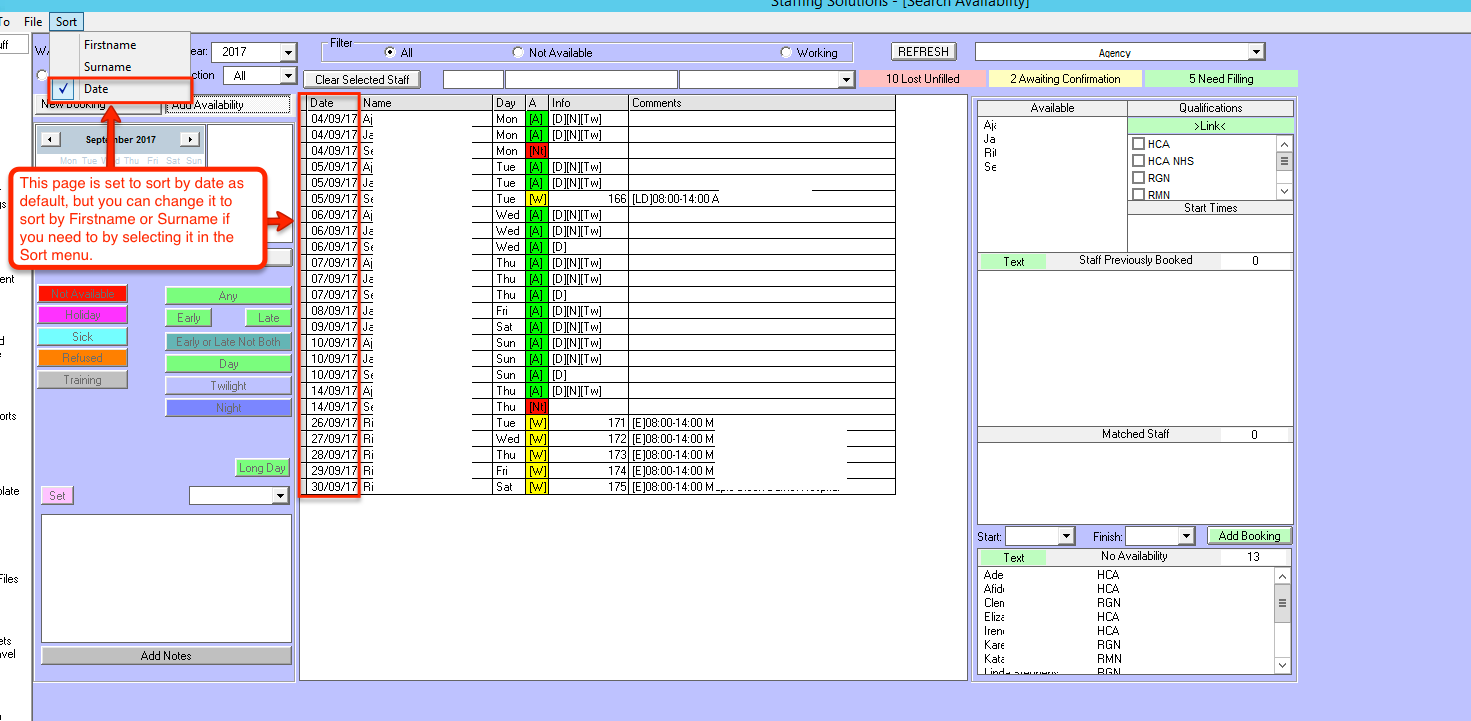
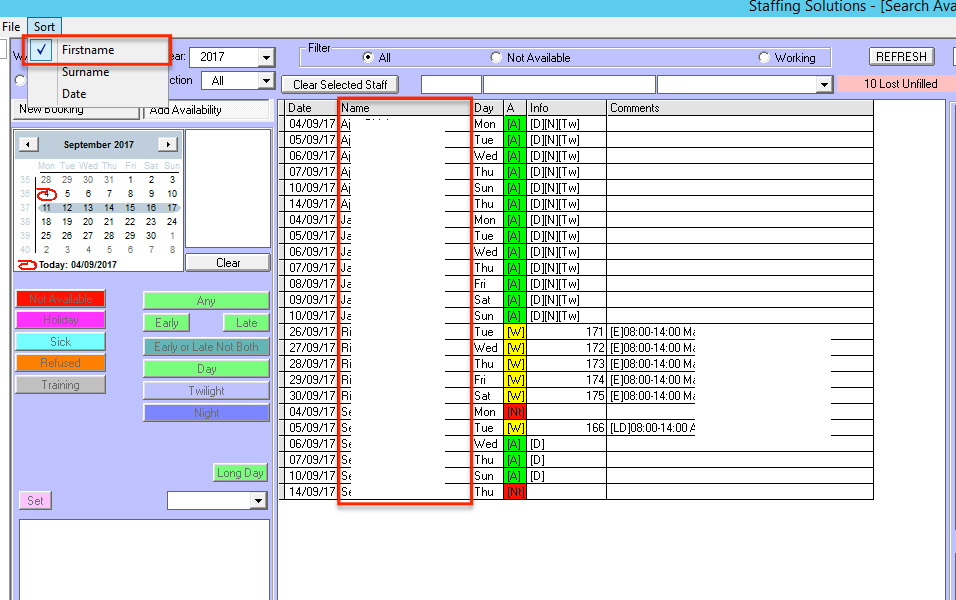
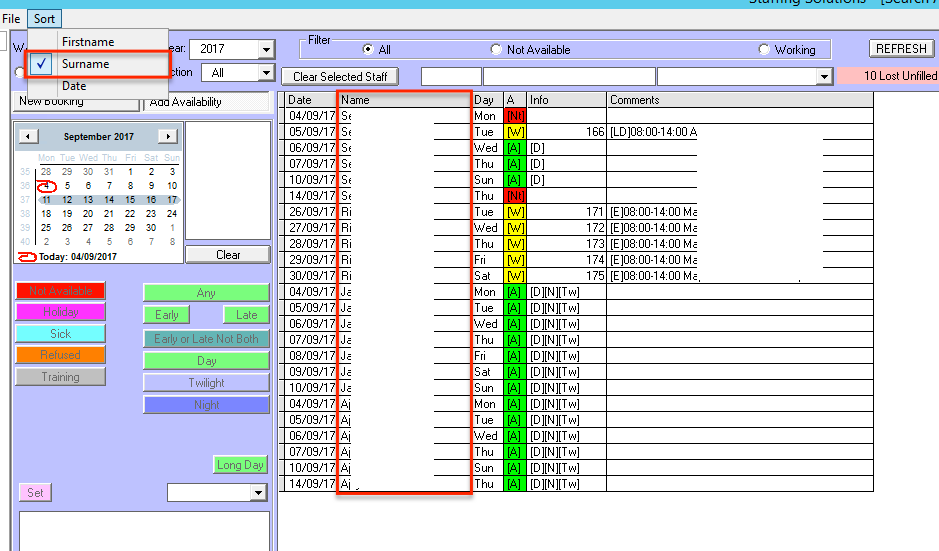
This page is automatically set up to sort the availabilities by date, but there is a way to change that if you need to. Click Sort in the menu bar at the top of the screen, then choose between Firstname, Surname, or Date to choose your method of sorting. First Name will load the list based on the alphabetical order of the staff member’s first names, Surname will load the list based on the alphabetical order of the staff member’s surname’s, and Date will load the list based on the date ascending.
As you can see, the list is ordered by the firstname of the staff members.
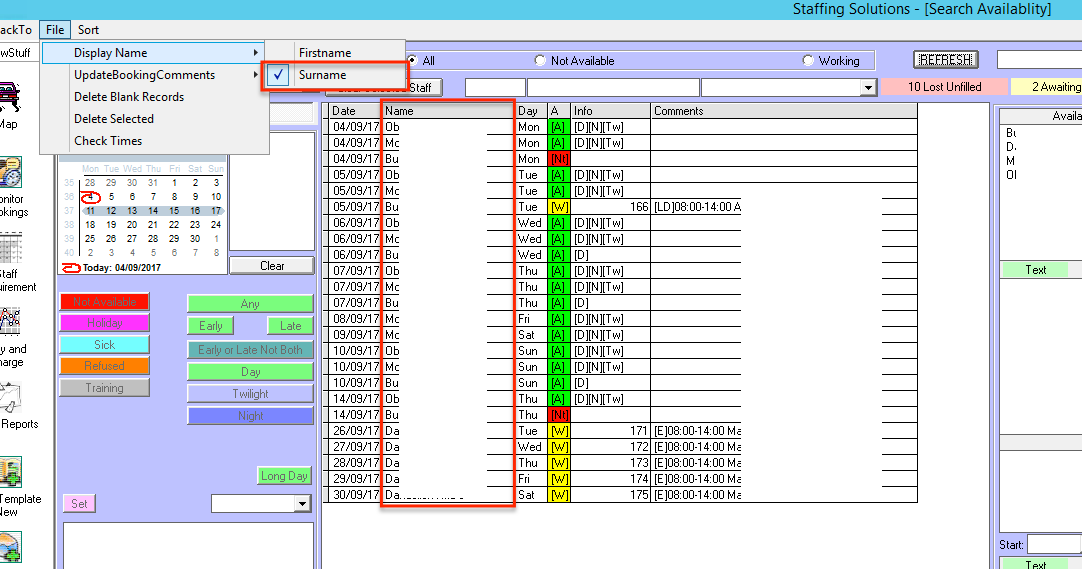
The same is applied with Surname.
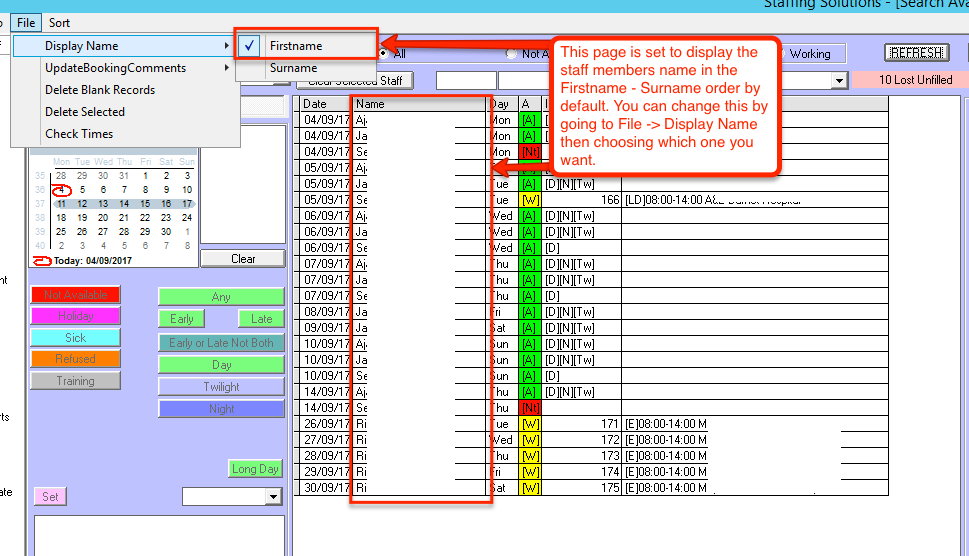
By default this page displays the staff member names as ‘first name - surname’. There is an option to change that if you wish to do so by Clicking File, then choosing Display Name, then selecting which name you want to display first. For this change to take effect you will need to click the refresh button to reload the list with the new name layout.
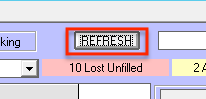
Click the refresh button to load the new availability list
Print
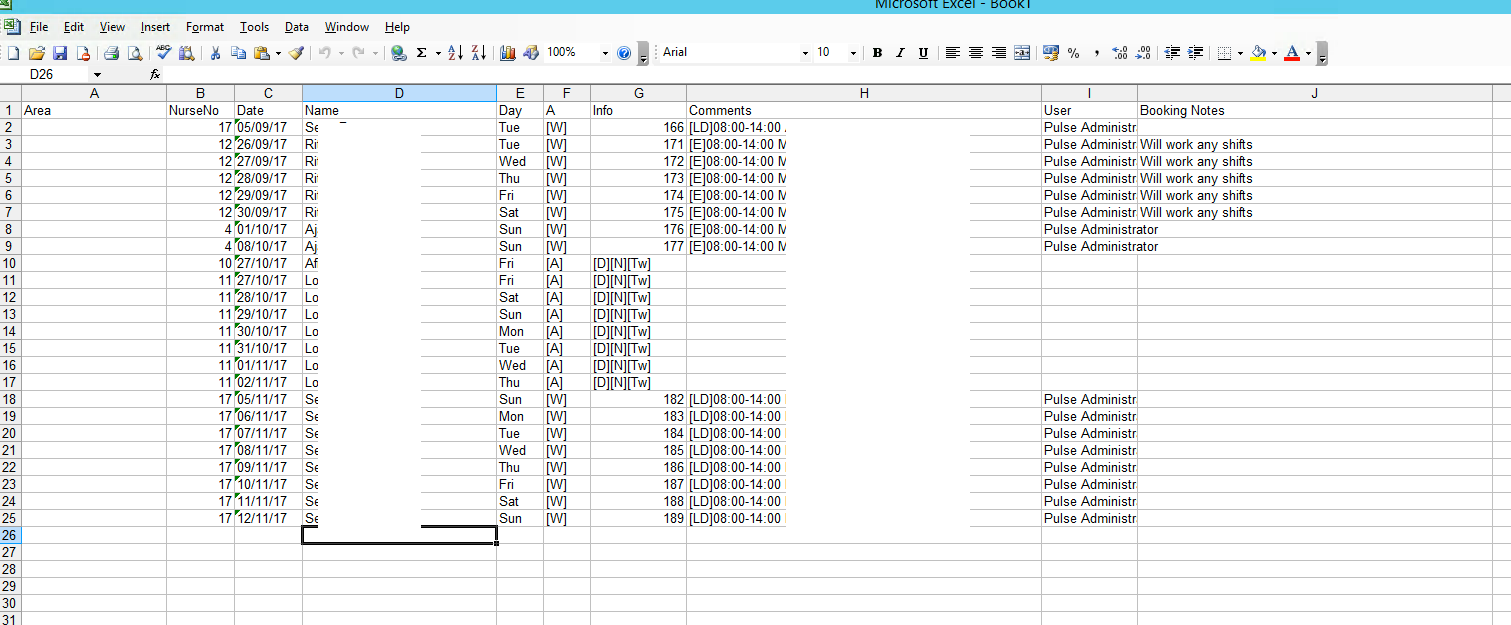
To send the availability list to Excel click Print, then Availability.

An Excel sheet containing the availability list will load up where you can print it, edit it, or save it.
Records that have DELETE in the comments can be removed from the system by clicking File -> Delete Blank Records.
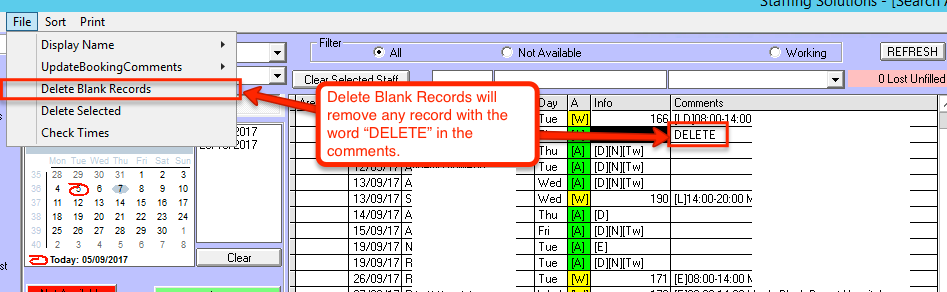

As you can see, there are now no records containing the word DELETE in the list.

The No Availability list shows a list of staff members who have no availability in the system. (Note: this is not the same as “Not Available”, it means there is no record of availability in the system which most likely means the staff member hasn’t given you their availability for the week/month).
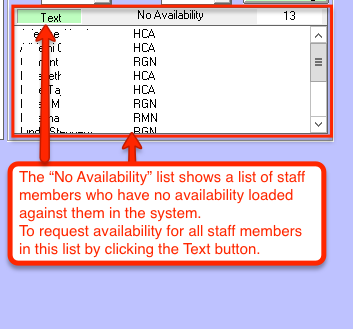
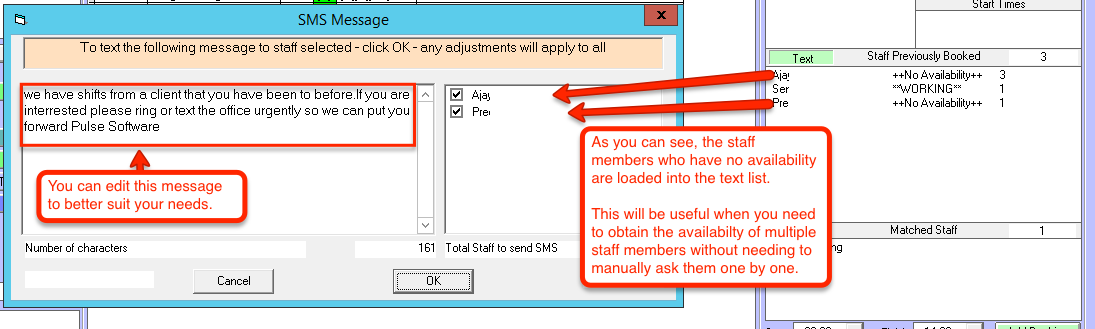
To make the gathering of missing availability much easier, you can send a text to all of the staff members in this list telling them to fill you in on their availability for a period. When you click the Text button, all of these staff members are automatically loaded into the message list so you don’t need to go through each staff member one by one adding them or messaging them individually.
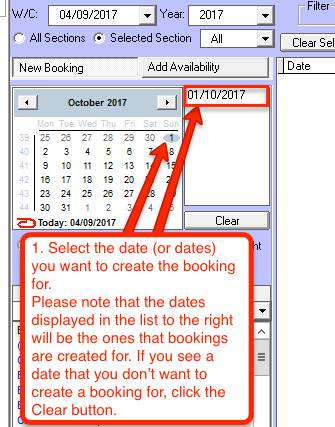
The first step in creating a new booking is to select the date you want to create the shift for. You can create multiple shifts with the same client if you select multiple days. Each time you select a new date it gets added to the list on the right which means that any action you perform, in our case creating a new booking, is performed on all the dates in that list. If you need to remove a date you have created by mistake you can remove it from the list by clicking it on the calendar.
The second step is to select the type of shift, ie ' Early, Late, Day, Twilight, or Night'

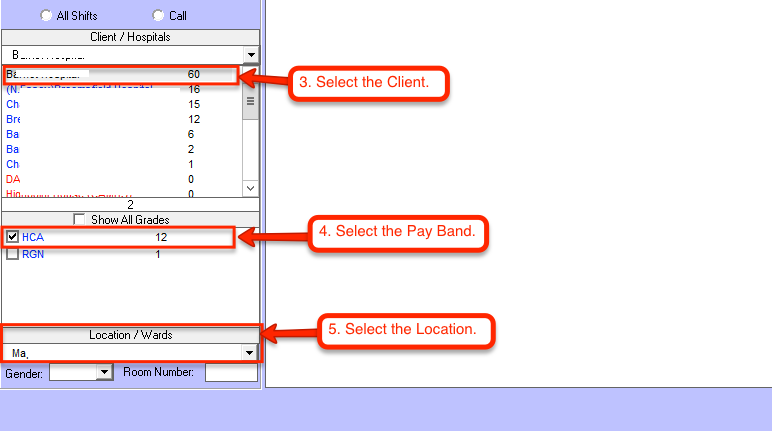
You must next select the client that you want to book the shift on, which pay grade will be working there (HCA, RGN, RMN etc.), and the location of the shift.
The people who are already set to' Available' in the system will show up in the “Available” list may end up being perfect for the shift you’re booking on.
You must next select the qualification of the nurse required for the shift, usually this is linked with the pay band and is automatically ticked and filled in for you after you select a pay band.
The “Staff Previously Booked” list contains a list of staff members who have worked previously.
The “Matched Staff” list contains people who have the correct qualification and the right availability to be able to work this shift.
To choose the staff member you want to add to the shift, select the staff member from any of the lists.
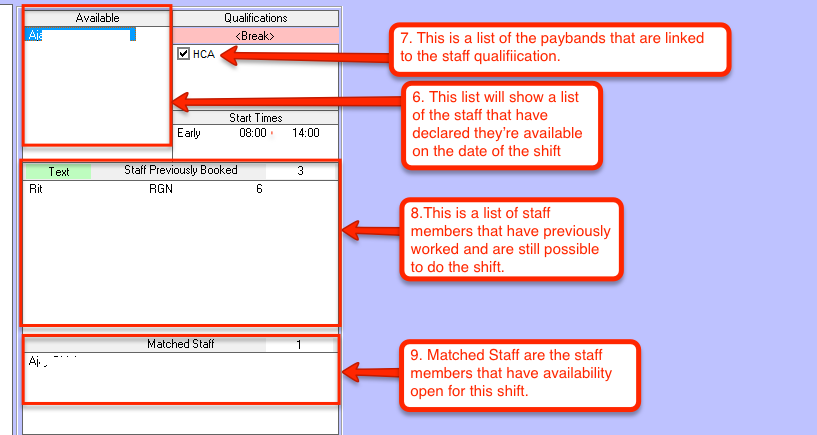
Under 'Staff Previously Booked' you can see the Staff Name and the Staff Grade followed by a number. The list is ordered not alphabetically but with the highest number first. This number indicates the number of shifts that person has worked in that 'Location' in the last 6 months.
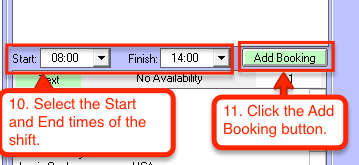
Next you must change the start and finish times of the shift if they do not agree exactly with those shown and , then click the Add Booking button.
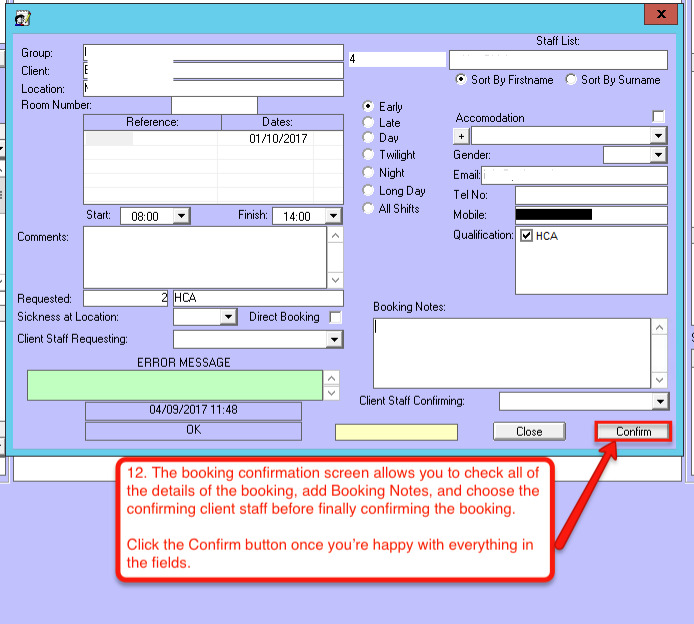
Assuming everything is entered, and the staff member you have chosen is available, you will be brought to the confirmation screen. From here you can check all of the details you have entered are correct, and you can enter the requesting and confirming staff members from the client’s end.
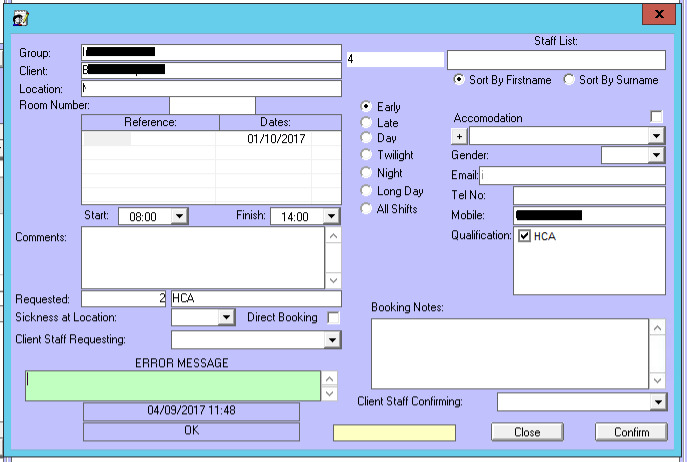
Once you’ve checked over all of the details and entered the requesting and confirming staff, you can confirm the booking by clicking the Confirm button.
Pressing the confirm button will automatically send a confirmation text to the employee
After the booking has been confirmed you will be brought back to the availability screen where you will now see a new availability entry containing the shift details and the staff member’s availability being set to working.

Go to 'Main' menu then 'Availability List'
Click the Add Availability button to load the availability side of this page, click the New Booking button to load the booking side of this page.
Adding Availability
This section allows you to add staff availability skip this if your availability is up to date and go to ' How to add a Booking'Select the date, or dates you want to add availability for. to do this select each date individually from the calendar, the date will appear in the list to the right., or click on the first date and holding the left mouse button down drag across to the last date.
The list containing the dates next to the calendar are dates that have been selected. Any changes you make from this point on will apply to all of the dates in that list. Make sure you've selected the correct dates. If you need to remove a date from the list, click the date again on the calendar it will then be removed from the list.
Select the staff member from the drop down list, then select an availability.
After Early is clicked, 5 new availability entries are created for the staff member we selected corresponding to the dates we selected. If you select 'Any' the screen will reply with a green 'A' for available followed by (D) (N) (Twilight)
When you want to return to the unfiltered list, you need to clear the date list and the selected staff.
Filter By Name
To load the availability of one specific person, select any one of their availability entries in the list then click the 'Refresh' button. If the person is not in the list this means they have not given any availability use the drop down box to select the member of staff as detailed on the 4th screen shot above and add availability.When the list refreshes the only availabilities that load will be the one particular person that you filtered by.
Update Multiple Entries
On this page, when you select an availability entry, it loads it into this list. Using this list you can select multiple availabilities at a time and change them all at once.
A warning message will appear asking you to confirm if the availability is OK to update. (Note: This message box will pop up for each item in the list)
As you can see, the three availabilities that were selected in the list have now been updated to Any.
Send Availability Reminder Text
Under previously booked staff, there is a warning message applied to a staff member when they have no availability in the system. This comes in useful when it comes to the bookings side, to ensure that you’re not blindly booking people into shifts without knowing if they will be available or not. If you click the Text button, the Text Message window will appear loading the staff who have no availability into the message list. From here you can send a message out to the staff members who have no availability asking them to get it to you ASAP.
Bookings Awaiting Confirmation & Bookings Need Filling
Clicking Awaiting Confirmation brings you to the Bookings to Confirm tab of the Create Bookings page. From here you can confirm any bookings you need to by selecting them and clicking the Confirm button.
Clicking the Need Filling button brings you to the Bookings To Fill part of the Create Bookings page. From here you can fill any empty bookings you need by clicking the Search Staff button.
Filter
The filter near the top of the window allows you to show all staff, not available staff, and working staff.
Change The Section
You can change the section that you’re working in by choosing it from the drop down menu in the top right of the page.
All Sections/Selected Section
You can also choose to view staff from all sections, or just the section you’re currently in by choosing one of these options.
Filter By Week Commencing
You can select the week commencing date to find availability from a specified date period. Change the W/C field to the Monday date of the week you’re looking for and the list will automatically reload with availability from that particular date onward. In this case, from the 25th of September 2017.
To set how long after the W/C date to display records, you can change the All drop down menu to 1 weeks, 2 weeks, 3 weeks, or 4 weeks.
Sort By Date, Firstname, Surname
This page is automatically set up to sort the availabilities by date, but there is a way to change that if you need to. Click Sort in the menu bar at the top of the screen, then choose between Firstname, Surname, or Date to choose your method of sorting. First Name will load the list based on the alphabetical order of the staff member’s first names, Surname will load the list based on the alphabetical order of the staff member’s surname’s, and Date will load the list based on the date ascending.
As you can see, the list is ordered by the firstname of the staff members.
The same is applied with Surname.
Display Firstname or Surname
By default this page displays the staff member names as ‘first name - surname’. There is an option to change that if you wish to do so by Clicking File, then choosing Display Name, then selecting which name you want to display first. For this change to take effect you will need to click the refresh button to reload the list with the new name layout.
Click the refresh button to load the new availability list
An Excel sheet containing the availability list will load up where you can print it, edit it, or save it.
Delete Blank Records
Records that have DELETE in the comments can be removed from the system by clicking File -> Delete Blank Records.
As you can see, there are now no records containing the word DELETE in the list.
Bookings
No Availability List
The No Availability list shows a list of staff members who have no availability in the system. (Note: this is not the same as “Not Available”, it means there is no record of availability in the system which most likely means the staff member hasn’t given you their availability for the week/month).
To make the gathering of missing availability much easier, you can send a text to all of the staff members in this list telling them to fill you in on their availability for a period. When you click the Text button, all of these staff members are automatically loaded into the message list so you don’t need to go through each staff member one by one adding them or messaging them individually.
How To Add A Booking
The first step in creating a new booking is to select the date you want to create the shift for. You can create multiple shifts with the same client if you select multiple days. Each time you select a new date it gets added to the list on the right which means that any action you perform, in our case creating a new booking, is performed on all the dates in that list. If you need to remove a date you have created by mistake you can remove it from the list by clicking it on the calendar.
The second step is to select the type of shift, ie ' Early, Late, Day, Twilight, or Night'
You must next select the client that you want to book the shift on, which pay grade will be working there (HCA, RGN, RMN etc.), and the location of the shift.
The people who are already set to' Available' in the system will show up in the “Available” list may end up being perfect for the shift you’re booking on.
You must next select the qualification of the nurse required for the shift, usually this is linked with the pay band and is automatically ticked and filled in for you after you select a pay band.
The “Staff Previously Booked” list contains a list of staff members who have worked previously.
The “Matched Staff” list contains people who have the correct qualification and the right availability to be able to work this shift.
To choose the staff member you want to add to the shift, select the staff member from any of the lists.
Under 'Staff Previously Booked' you can see the Staff Name and the Staff Grade followed by a number. The list is ordered not alphabetically but with the highest number first. This number indicates the number of shifts that person has worked in that 'Location' in the last 6 months.
Next you must change the start and finish times of the shift if they do not agree exactly with those shown and , then click the Add Booking button.
Assuming everything is entered, and the staff member you have chosen is available, you will be brought to the confirmation screen. From here you can check all of the details you have entered are correct, and you can enter the requesting and confirming staff members from the client’s end.
Once you’ve checked over all of the details and entered the requesting and confirming staff, you can confirm the booking by clicking the Confirm button.
Pressing the confirm button will automatically send a confirmation text to the employee
After the booking has been confirmed you will be brought back to the availability screen where you will now see a new availability entry containing the shift details and the staff member’s availability being set to working.